Sunday 30 June 2013

June Favourites

June has been a nail-art-tastic month for me-I've done quite a lot of it. Some stuff I loved and some stuff I wasn't so thrilled with but here's my absolute favourites:

-I only did one TST this month but I really rather liked it-it was inspired by the Barry M Limited Edition polishes:

Tribal Nail Art
-Rara did some super awesome cherry nails to celebrate being able to use both of her hands again which I just loved!

Cherry Pop 

-I really loved my Doctor Who Nail Art, I kept it on for days and just kept staring at my fingers. All my nerdy friends loved it too!

Wibbly Wobbly Timey Wimey

-I attempted the ultimate skittle for Nailed It NZ's nail art competition-I didn't win but I still loved doing a mani that incorporated all the techniques I've tried since I started my blog

Ultimate Skittle Mani

 -But my ultimate faaaaaave mani this month has to be my Doc Marten nail art-I've been wanting to do them for months and months and finally did, and I think they turned out great!

DM Nail Art

What were your favourite manis this month?

~Nail Art Novice~

Saturday 29 June 2013

ABC Challenge: Y is for Yellows and YRNails

I can't quite believe that it's nearly the end of the ABC Challenge already! I know I joined at the half way mark but it still seems to have flown by so quickly! Luckily we're already planning our next challenge as a group, woohoo!

So this week is Y and like a lot of people I reached for the yellows-although I don't actually have any polishes that start with 'Y' to use! This is a couple of lovely Revlons-Electric (the darker-3 coats on its own) and Sunshine Sparkle (the paler-2 coats over a coat of Barry M-Matt White). I also added in a lovely water decal by YRNails to get another Y in there, and because it's been a while since I used them. I've only done so twice before-once fairly successfully and once disastrously! I was hoping that this time it would go well, and thankfully it did!


I chose these delicate little bird cage decals to go with my lovely shimmery yellow and I really love them! I also added some La Femme Beauty glitter to my other nails-sadly it doesn't have a name or even a number but it's a mix of small purple and even smaller black glitters with gold and turquoise hexes and it's really pretty-I think it looks fab over Electric (my new favourite yellow polish-it's so bright and has a touch of shimmer to it too!)
For such a relatively simple mani, I'm really enjoying this look. I also really can't believe we've only got one week left in this challenge-boo! If you want to join in our next one then I will let you know the nitty gritty next week in my Z post. The ladies involved are all really wonderful and I'm so looking forward to taking on another challenge with them all. As ever, don't forget to check out all their fabulous 'Y' manis in the Inlinkz below.

~Nail Art Novice~


Wednesday 26 June 2013

Guest Posting over at Southern Sparkle

Hello lovelies!

Today you can find me guest posting over at Southern Sparkle Nail Art here. I've included a sneak peak picture for you but you'll have to go to her blog to see it properly!


A little bit of tooty fruity nail art!

In other news, and because I've been quite bad at promoting it, I've (finally) started a Facebook page for my blog, which you can find here. It doesn't have much on it yet but I'm working on it =)


~Nail Art Novice~

Tuesday 25 June 2013

Born Pretty Holo Polish + British Indie Accents

A few weeks ago when the Born Pretty store brought out their holo range, they put 200 polishes up for grabs if you shared the information about them on certain social media platforms and I was lucky enough to 'win' one from this mini giveaway. I had a tough time choosing which colour I wanted because there were so many really pretty ones, but in the end I plumped for #8-a tealy blue shade. It only took a couple of weeks for the polish to arrive and it was really well packaged when it did come. It's slightly darker in the bottle than it was on the listing but it's still a really gorgeous blue-more cobalt than teal.

I have a habit of wearing similar base colours underneath my holos because they take so many coats to build to opacity, but I did test this one on my thumb to see its true colour:

Born Pretty Holo Polish #8, No topcoat
As you can see, the colour built up really well and I definitely could have got away with only 3 coats. The linear holo is really awesome and you can spot the full rainbow running through it. I didn't manage to get any shots in the sun because of our crummy weather at the moment, but it's still visible inside too. For my other fingers I used 2 coats of the holo polish over 1 coat of Maybelline-Dark Denim which has made the colour slightly darker than on its own, but not by much.


I did find the square shape of the lid a little difficult to hold whilst I was polishing but there was nothing that would cause major problems. The brush is quite long and flat so gives good coverage.
The polish on its own is beautiful, but I wanted to add a little something extra to make it even more special, and I had the perfect polish just sitting on my desk begging to be used. Pocket Money Polishes are a new, British, indie brand made by the lovely Charlie (who you may remember from her guest post in May) and she has designed two collections called her 'Glitter Babies'. (The new one is launching on July the 1st-check out all the details here). This polish is from her first collection and is called Starry, Starry Night and it's GORGEOUS. It's full of blue matte glitter, gold holo glitter and tiny white stars and is almost impossible to capture on camera, especially over the holo background, but I did my best:

This was the ONLY picture I could pick
up those gold sparklies in!


My camera just couldn't cope with everything I was throwing at it in these photos, so you can't see how pretty this combination is in real life I'm afraid, you'll just have to trust me that it is stunning. I keep getting dazzled by all the holoy sparkly goodness =)

You can buy the Born Pretty Holos here, currently they have a 50% off sale so are $6.44 for 6ml, with free shipping.
You can buy Pocket Money Polishes' Glitter Babies here, but they're seriously limited edition-Starry, Starry Night is already gone I'm afraid! They're £4 for 5ml + £1.50 postage. Look out for the new gorgeous collection arriving on the 1st of July!

~Nail Art Novice~

Is It A Challenge? Is It A Giveaway? It's BOTH.

Yesterday I got an email from the lovely Jacqui at CraftyNail.com who follows me on Bloglovin. She wanted to let me know about a new 31 Day Nail Art Challenge that's going to be occurring throughout July, hosted by her and two other bloggers. I'd missed this completely so I thought I'd share it with you in case you had too!

It's the Oh Mon Dieu! It's the Rather Awesome 31 Day Challenge Giveaway-which is a bit of a mouthful but there's good reason for it. All the details are on Jacqui's blog (follow that link) but the gist of it is that there's a new theme each day for 31 days for you to use as inspiration for your nail art, and then you can upload them to the inlinkz on one of the host blogs for all to see. The rather brilliant twist in the tale is that each day you complete gets you one entry into to giveaway part of the challenge-so you can earn up to 31 entries if you take part every day. There are FOUR prize packs to be sent all over the world so where ever you are entering from you've got a good chance of winning them.

I won't be entering every day because I like to wear my nail art for longer than 24 hours, and also because July is my birthday month so I'll be doing fun birthday things-woo! I do plan on entering where I can though, because I think it looks really fun! I hope some of you lovelies will join me too.

For all the details and the challenge list itself go here.

Thanks to Jacqui for letting me know about this in the first place =)

~Nail Art Novice~

Monday 24 June 2013

ABC Challenge: X is for X Marks The Spot

I had a really great idea for these nails but it just didn't translate well, probably due to my poor art skills! I wanted this to be like an old treasure map with X marking the spot and a trail to follow but I'm not sure how well it's turned out.

Polishes used: Barry M-Lychee  as a base colour with London Girl-# 95 sponged on top. For the details I used a dotting tool and OPI-Suzi Loves Cowboys. From little finger to thumb it's supposed to be a compass point, a ship, a dotted line trail and an island with X marking the spot for treasure. My right hand just has waves and an island because by this point I was rather tired and couldn't be bothered repeating all the details with my non-dominant hand.


I'm just not feeling this really. It feels weird having such neutral colours on my nails and I don't think the nail art is the best I've ever done. Be sure to check out the other ladies in the inlinkz collection for some much better x-amples (haha) of 'X'!
~Nail Art Novice~

Friday 21 June 2013

P P P P Pick Up A...

Hi all,
Just a quick post before I leave for Sheffield (my second home!) for a couple of days. Obviously this was supposed to be part of the ABC challenge but I've had an awesome idea for X which will take me AGES to do if I manage it, so I'm dedicating Sunday to that. In the interim I've thrown this one together really quickly with some bright colours and penguin accent nails-penguins are my favourite animal, they're just TOO CUTE.

All polishes are Barry M (surprise surprise!)-Black, Matt White, Mango, Passion Fruit, Guava and Key Lime plus their fabulous nail art pens in Black and White. I also added a little bit of sparkle with China Glaze-Fairy Dust.


Haha, I love these little guys, they're so adorable!

Hope you like them too. I'll be back late tomorrow (Saturday) night, tata!

~Nail Art Novice~

Monday 17 June 2013

Doc Martens Nail Art!

-Pic Heavy Post-

Hello lovelies!
Today I have a confession: I have another love outside of nail polish/nail art and that's my Doc Martens. I've got 5 pairs (at the moment) and keep adding more every year. My mum always rolls her eyes whenever I get a new pair and says "You can only wear one at a time!" so I thought I'd try and prove her wrong with some nail art. I had a quick search and couldn't find any previous examples out there so I came up with this design all by myself! I've been waiting to do it for months and months, because I needed the perfect blue and finally I have it (thankyou Barry M!).

Firstly, let me introduce you to my lovelies:


 I got the bright green ones in 2007 and have basically been obsessed with them ever since! I really love wearing them with miniskirts and opaque tights-it's sort of become my signature look really and it always makes me feel amazing.

Anyway, on to the mani! I wanted to recreate the colours of my Docs as closely as I could so I used many many polishes! Red-Revlon-Fire, Teal-Sally Hansen-Fairy Teal, Blue-Barry M-Blue Grape, Patterned White-Barry M-Matt White, sponged with Topshop-Cloud and  Rimmel-Tangy Tangerine and for the bright green Barry M 2013 Superdrug Limited Edition (such a catchy title)-Neon Green. I used two coats of them all, and put two coats of Matt White underneath the neon green too. For the iconic brown soles I used OPI-Suzi Loves Cowboys (over some curved French tip  guide stickers) and for the instantly recognisable orange stitching I used a Stargazer polish-number 103 (UV-glow Orange). The black lacing details were done with the black Barry M nail art pen. Phew! I also used my H&M Matte top coat on my index/ring fingers to simulate the leather effect, as opposed to the patent shiny shiny ones. I'm not sure how well you can tell in these pics though! (I have to admit I had a lot of fun taking them!)

Doc Marten Nail Art

Doc Marten Nail Art

Doc Marten Nail Art

Doc Marten Nail Art

What do you reckon? Are they too cool for school or what? I could do a tutorial for these if people wanted, although I reckon they're pretty easy to figure out! If you do your own version, let me know =)

They make me super happy! =D

~Nail Art Novice~

In a total piece of blogging serendipity, I didn't even realise that one of the nail art groups I'm part of has the theme of 'Shoes' for this week! So here's some more footwear inspired manis:

Friday 14 June 2013

ABC Challenge: W is for Wibbly Wobbly Timey Wimey

~Pic Heavy Post~

I was discussing this challenge with Rara and said that I didn't really have many good ideas for 'W'. We were chatting about it and she came out with 'Wibbly Wobbly Timey Wimey' which, for those of you who don't know, is a Doctor Who reference. Part of me knew this was going to be ridiculously hard, but I like a challenge so agreed to give it a try. Apologies to the non Whovians amongst you, this one's going to get nerdy =p


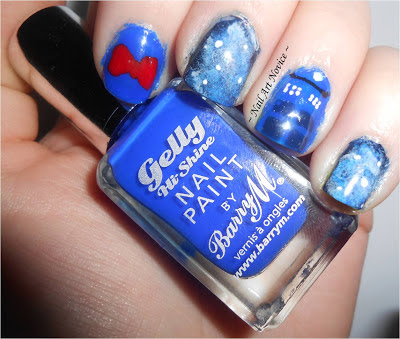
Polishes used: Barry M-Blue Grape (the perfect TARDIS blue!), Revlon-Fire (for the all important bow tie) and the black and white Barry M pens. The 'panels' on the TARDIS were done with a mixture of Blue Grape and Barry M-Black. For the galaxy/space nails I used Rimmel-Midnight Blue for the base and then sponged on Barry M-Matte White, Barry M-Cobalt BlueBarry M-Navy and Barry M-Moondust

From thumb to little finger we have the new Doctor Who logo, number 11's bow tie (because 11 is my Doctor), a space/gradient scene because we all know the Doctor is a mad man in a box who goes flying around in space, Sexy, the type 40 TARDIS and another space scene because I tried to draw a sonic screwdriver and failed. I've done the same on my right hand but changed the thumb to say 'Doctor Who' (because my left hand isn't good at doing straight lines!)

Doctor Who Nail Art

Doctor Who Nail Art

Doctor Who Nail Art

Doctor Who Logo Nail Art

So there we have it, I'm a colossal nerd. A very happy one though, because I'm super pleased with these! If I could never take this mani off I'd still be happy with it-I love it! Sorry if you've never seen/don't like Doctor Who though, they probably won't make much sense to you, but that's OK.

And as a bonus measure, here's a picture of me running away with The Doctor himself (I WISH!):


Geronimo!

~Nail Art Novice~
Don't forget to have a look at some of the other awesome 'W' designs:


Wednesday 12 June 2013

Things What I Did Won

A couple of weeks ago I won a giveaway over at It's All About The Polish and so I thought I'd share my goodies with you now they've arrived safely. I'm now the very proud owner of some pretty Australian Indies including my very first piCture pOlish (does ANYONE know why it's capitalised like that, I've wondered forever?) and my very first  Pretty Serious *swoon*


From L-R that's Pretty Serious-Party By The Pool, MaxFactor-Fantasy Fire, piCture pOlish-Mirage, Loki's Lacquer-Buddy, Gloss 'n Sparkle-Slowly Growing Deaf and Loony Lacquer-Love A Lot.
I've done a quick swatch of them on swatch sticks, and will try and get proper swatches of them up soon but in the meantime I'll try and find some links so you can see them in all their glory =)

Party By The Pool

3 coats

I have to confess this is my favourite of them all-but then again it would be, right? It's a teal jelly with blue and green glitter in it and I love it love it love it! Here's a swatch from Lucy's Stash.

Mirage
2 coats on its own/
2 coats over black


This is a terrible quality swatch for which I can only apologise. Mirage is a gorgeous greyish duochrome that shifts from green to blue with a hint of purple in it too. On its own I imagine it'd take a lot of coats to become opaque, but over darker colours it's gorgeous! Here's some swatches by the person who it was made for-Sarah Hassan's Blog

Buddy

3 coats

Buddy was a bit of a surprise for me-it's so pretty! It's a lilac shimmer with holo glitter in it that shifts to green in certain light which was released as part of Loki's Lacquer Easter range this year. Here's some swatches from Osiris and Loki.

Slowly Growing Deaf

2 coats

This one is really pretty-red and silver glitters in a baby blue base, I really like it. I think I may have to do some nail art using this baby soon. Nailed Obsession has got some good swatches.

Love A Lot

2 coats
I am surprised how much I like this polish-I originally thought I wasn't going to because I'm not much of a pink person at all! When I got it onto my swatch stick though, I was pleasantly surprised, it looks really fun! It's a mix of red and pink glitters in a white creme base-there are also hearts in the mix but I haven't managed to fish one out yet. Apparently this is really limited edition so I'm even more excited to own it. Marie's Manicure Madhouse has some swatches.


Hope you've enjoyed this post, keep an eye out for these polishes in future ones! =)

~Nail Art Novice~

Tuesday 11 June 2013

Chick Chick Chick Chick Chickens

Hello =)
Just a quick post for you this time! I've been in Sheffield visiting friends this weekend as it was a friend's hen party on Saturday night. It was fancy dress and the theme was 'Sexy Chicken' and because I couldn't really afford to buy/make a costume, I put some chicks on my nails instead!

Polishes used: Revlon-Sunshine Sparkle, Rimmel-Sunshine, Barry M-Lychee, Barry M-Mango plus  the black and white Barry M Nail Art pens. I forgot to take my dotting tools so I had to improvise with the help of some hairgrips and they work surprisingly well as stand ins!


The hen do was fabulous-lots of cocktails and karaoke (which I LOVE =D ) and my nails got me lots of compliments. I didn't get home til 4am which is always a sign of a good night!

Back to more regular posts tomorrow, I need to catch up on my sleep!

~Nail Art Novice~

Monday 10 June 2013

Cherry Pop

Guess who's back? It's Rara, YAY! (For those of you who don't know Rara is my best friend and occasional partner in blogging, and she broke her wrist about a month ago and so has been out of action for a while.) This is her first blog post in a couple of months and I'm really glad she's back! (If only so I get a break, haha-just kidding!)
Over to Rara then:

~

Having had pretty boring nails for three/four weeks while my hand was in a cast I've been craving beautiful nails again, if only to stop me looking at the scar all the way along my wrist =(  Luckily Novice has been on hand to do them for me!
I'm far enough along in my recovery now that I can straighten and bend my fingers and turn my wrist to enough of an angle to paint my own nails again-yaaaay! And a good thing about not being able to use my hand is how long and strong my nails have gotten. Although I cannot do the 'traditional' pose for the pictures (as I still can't bend my thumb) I have tried my best.
Because of the lovely weather I wanted something summery so I decided on cherries.


[Novice] I know it's not the traditionally done thing but I
LOVED the backdrop she was using against those cherries =)


I used Barry M-Matt White with a glittery top coat by Rimmel called Disco Gold, Barry M-Matt White and Essie-Mojito Madness and topped everything off with a Barry M Topcoat.

This was an easy and simple mani that I was even able to do on my right hand!
I really like this one, it's so bright and summery...it makes me and my stupid broken hand/wrist happy!!!


~Rara~

~

Aww, I love this super fun mani! I'm also really glad that Rara's almost back to full fitness too. I'm sure you'll be seeing her around here more often again now!

~Nail Art Novice~

Sunday 9 June 2013

31BPC-Part 13-Do You Have Regret?

I had completely intended to get some nail art up for you yesterday but I am visiting friends in Sheffield and completely forgot to bring my camera cable-my apologies! It just means you'll get lots of posts next week instead I guess! So instead here's today's 31BPC post

Do I have regret? Well I try not to really, because I figure that everything in my life that I have regretted at one point or another has steered me to becoming the person that I am today. There were some big regrets that I held on to for a long time, but it doesn't get you anywhere in the end, does it? I think it's better to accept that events happened and that they changed you for whatever reason, but you can't go back and do anything to prevent it. Instead of regretting doing something or not doing something or whatever it may be, I try and learn from it, try not to do it again, try to make it a productive force in my life rather than a destructive one. There are things I've done that I'm not proud of, but all I'm trying to do is not repeat them, and then I can feel like even if they were things I regretted at the time, I can at least learn something from them.

So no, regret is a pretty useless thing to cling to, really.

~Nail Art Novice~

Friday 7 June 2013

ABC Challenge: V is for Valiant and cheVrons

I only have one 'V' polish but I knew I wanted to use it today because it's a colour I really rather like. Valiant by L'Oreal is a lovely tarnished silver/gun metaly sort of colour that I used as a base for some chevron nail art-because chevrons are essentially just 'Vs' anyway, right?


I had to be pretty valiant with this mani-it's not a difficult one at all, and I was using some French mani guide stickers I got on Ebay to make the chevron shapes so should have been a doddle but I had so many problems with it. I nearly gave up on it several times but persevered in the end and it's turned out OK. It's annoying that it doesn't show how much effort went into it though-it took me an hour and a half in the end! AAH.

Anyway. Other polishes used were Collection-Look At Me!, Barry M-Mango, Barry M-Key Lime, Barry M-Guava and Barry M-Prickly Pear (Haha, guess what collection I bought the other day?!). I love the effects you can get mixing different types of polishes-in this case a shimmery metallic and some cremes.


By the time this was done I really didn't care about the wrinkles you can see in some of them-I wasn't starting again! It's not perfect but it'll do, and sometimes that's the best you can hope for! I dunno...the colours are awesome but I'm not really feeling it after all the trouble it caused me!

Hoping for better luck next week! In the meantime, check out all other ladies' entries on the Inlinkz below =)

~Nail Art Novice~


Tuesday 4 June 2013

Try Something Tuesday: Tribal Nail Art With Barry M

Hello lovelies =)

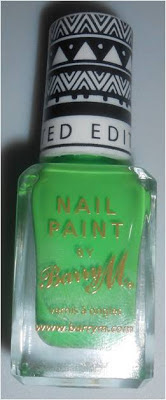
Today I popped into Superdrug on the off chance that they might have the new Barry M Gellys ahead of their launch tomorrow and I got lucky! They had all of them except Passionfruit (the red one) so I snapped them up! They were also on 3 for 2 so I also got Pricky Pear from the original Gelly collection and one of the new Superdrug Limited Edition (SLE) Neons as well. When I got home I decided to throw on some new nail art and my eye was caught by the funky tribal pattern on the SLE bottle so I decided to use it as my inspiration for today's mani.

Barry M Superdrug Limted Edition 2013 Neon Green

Polishes used: Barry M-Superdrug Limited Edition 2013 (Green), Barry M-Matt White (I decided it was finally time to upgrade to a decent white polish!) and Barry M-Black plus the black and white Barry M Nail Art Pens. The SLE polish is a super bright neon-the colour of highlighters! I layered 3-4 coats (some were thicker than others) over a white base, painting my accents white. I used striping tape to block off/fill in the various sections for the tribal accents and then went to work with my nail art pens and this is what I ended up with:

Tribal Nail Art with Barry M Nail Art Pens and Barry M Superdrug Limited Edition Neon Green

My cuticles are a little bit yellowy but I think that's due to dodgy cleaning up more than anything else. I'm quite proud of those tribal designs, it goes to show how awesome the Barry M pens are! I love the super bright green but I felt like it needed just a little something more so I added a couple of coats of Seventeen's Graffiti Effects in Monochrome to add a bit of pizzazz.

Here's the final mani:

Tribal Nail Art with Barry M Nail Art Pens and Barry M Superdrug Limited Edition Neon Green, plus Seventeen Graffiti Effects in Monochrome
Apologies for the slightly fluffy fingers,
I think they're strands from my jumper!

I just love that glitter! I can only apologise in advance 'cos I have a feeling you're going to be seeing that one a lot, as well as a lot of nail art with my Gellys.

What do you reckon to the Limited Edition Neons? (There's also a pink). Will you be investing?

Until next time!

~Nail Art Novice~

Sunday 2 June 2013

31BPC 12-Something That You Miss

What I really, really miss is living in Sheffield. I went to uni there and lived there for three short years of my life, but during that time I completely fell in love with the city. It's a really beautiful place and it feels safe and happy-and has recently been announced as the happiest city in the UK-and I can understand why! The city centre is full of fountains and greenery and is gorgeous, it's full of beautiful old red brick buildings covered in ivy and the whole place just has this really lovely vibe to it. I also have lots of friends who are based there permanently and I want to be back there so I can spend time just chilling at the pub with them, or hanging out in their living rooms just chatting about life. It's my favourite place and I always feel like I'm coming home when I visit it. It does make me kinda sad sometimes that I don't live in the place where I want to be, because I miss it terribly.

I'm determined to get back, someday, and hopefully someday soon!

~Nail Art Novice~

Read the other 31BPC posts hereOneTwoThreeFourFiveSixSevenEightNine, Ten, Eleven

Featured on Imperfectly Painted

Today I have a mani featured on Imperfectly Painted in her 'Share With You Sunday' post

Here's a sneak peek:

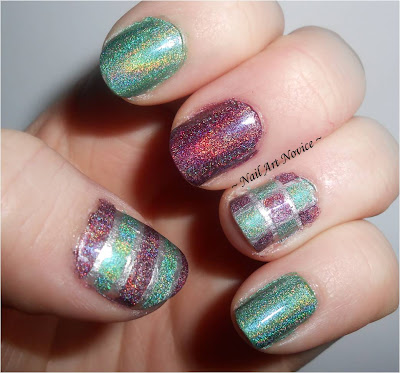
Striping Tape Nail Art with Layla Holo Effects in Misty Blush and Emerald Divine

but you'll have to go to Imperfectly Painted to see how it was done and find out what polishes I used [LINK]. Why not submit one of yours while you're there too?

~Nail Art Novice~

Me, Myself and I-The Ultimate Skittle

Hello!
I found out the other day that one of my favourite nail art blogs-Nailed It NZ- is having a nail art contest (and giveaway!) to celebrate her first year of blogging and I decided I really want to enter (despite the fact that I have little chance of winning looking at some of the amazing entries so far!)
The theme is 'Me Myself and I' and Jessie also says 'Make sure your manicure tells me something about you - I'm interested!.. Whatever you like - I like reading, so feel free to tell me a story about how your nails relate to you!' which I think is a really fun addition to it!

I sat down and had a think about what I wanted to do-you can submit up to three entries so it was a tricky decision! I decided this is what I wanted to do first though.

First-the back story! I am known in the blogosphere as Nail Art Novice because that's really what I am! This time last year, the only remotely interesting thing I did to my manicures was to add Crackle top coat. I started this blog in January and have since then learned a lot more cool tricks-whether that's by following other people's tutorials, getting advice and tips from some of the awesome ladies I've met through the nail blog networks on Facebook or just by playing around by myself to see what I can come up with. I still consider myself to be a Novice though, there's so many things I've never attempted yet, and I think I'll always be one because I'm hoping to keep improving my skills.

For this mani then, to represent me, to represent my blog and to represent my new found passion for nail art I decided to do the Ultimate Skittle incorporating all the different techniques that I've tried since starting my blog. I was originally going to do it in a rainbow of colours, because I really love rainbows, but thought that might start to look a bit too random and mismatched. Instead, I've decided to go with some of my favourite colours-blues and greens, with some silver and gold in there to add some contrast and detail. Quite co-incidentally I've also used polishes from the 3 brands I own the most of-Rimmel, Barry M and Revlon, although that was purely by chance!


Polishes used: Barry M-Navy, Barry M-Teal, Rimmel-Camouflage, Rimmel-Jaded Glamour, Barry M-Gold Foil and Revlon-Silver Screen. The glitter top coat is China Glaze-Fairy Dust and there's also a small amount of MaxFactor-Fantasy Fire and Barry M's silver nail art pen on my left thumb.

Techniques used:
Left hand, little finger to thumb: Dotticure, Striping Tape, Stamping, Gradient, Freehand scarab nail art (inspired by this tutorial by Holy Grail Nails)
Right hand, little finger to thumb: Splatter mani, Fishtail, Fan brush, Saran Wrap, Freehand rose nail art


This was the mess of my work station half way through!

and this was the state my fingers were in!
But it all turned out good in the end!

I really love these colours together in all the various combinations and would definitely wear all of these as full manis. I'm a bit unimpressed with my fan brush this time around, but I think that's more because all of the colours have blended together to make 'generic green' than anything else. The nail I spent by FAR the longest on was actually the stamp-what you can see is my 5th or 6th attempt and my 4th stamp choice and if this one hadn't have worked I was going to do something else! It made me so mad! Luckily it came out well on my last attempt, phew!

OK, I hadn't realised how long this post had got (sorry) so I'll leave you now!

~Nail Art Novice~
Related Posts Plugin for WordPress, Blogger...