Showing posts with label Try Something Tuesdays. Show all posts

Tuesday, 4 June 2013

Try Something Tuesday: Tribal Nail Art With Barry M

Hello lovelies =)

Today I popped into Superdrug on the off chance that they might have the new Barry M Gellys ahead of their launch tomorrow and I got lucky! They had all of them except Passionfruit (the red one) so I snapped them up! They were also on 3 for 2 so I also got Pricky Pear from the original Gelly collection and one of the new Superdrug Limited Edition (SLE) Neons as well. When I got home I decided to throw on some new nail art and my eye was caught by the funky tribal pattern on the SLE bottle so I decided to use it as my inspiration for today's mani.

Barry M Superdrug Limted Edition 2013 Neon Green

Polishes used: Barry M-Superdrug Limited Edition 2013 (Green), Barry M-Matt White (I decided it was finally time to upgrade to a decent white polish!) and Barry M-Black plus the black and white Barry M Nail Art Pens. The SLE polish is a super bright neon-the colour of highlighters! I layered 3-4 coats (some were thicker than others) over a white base, painting my accents white. I used striping tape to block off/fill in the various sections for the tribal accents and then went to work with my nail art pens and this is what I ended up with:

Tribal Nail Art with Barry M Nail Art Pens and Barry M Superdrug Limited Edition Neon Green

My cuticles are a little bit yellowy but I think that's due to dodgy cleaning up more than anything else. I'm quite proud of those tribal designs, it goes to show how awesome the Barry M pens are! I love the super bright green but I felt like it needed just a little something more so I added a couple of coats of Seventeen's Graffiti Effects in Monochrome to add a bit of pizzazz.

Here's the final mani:

Tribal Nail Art with Barry M Nail Art Pens and Barry M Superdrug Limited Edition Neon Green, plus Seventeen Graffiti Effects in Monochrome
Apologies for the slightly fluffy fingers,
I think they're strands from my jumper!

I just love that glitter! I can only apologise in advance 'cos I have a feeling you're going to be seeing that one a lot, as well as a lot of nail art with my Gellys.

What do you reckon to the Limited Edition Neons? (There's also a pink). Will you be investing?

Until next time!

~Nail Art Novice~

Tuesday, 21 May 2013

Try Something Tuesday-Fan Brush Effect

I've been seeing these manis around a lot recently and really liked the look of them but had no idea how to do one! I went on Youtube and searched for 'fan brush manis' and found a couple of tutorial videos and it turns out it's a lot easier than I was expecting it to be! (The best one I found was this one by DearNatural62) As I'd got some fan brushes in the last set I bought from t'Ebay I thought I'd give it a shot!

My base colour is 3 coats of Revlon-Blue Lagoon which is a gorgeous baby blue shot through with silver shimmer. The colours I used over the top were Sally Hansen-Fairy Teal and Rimmel-Sunshine. I knew that these wouldn't blend together to create new colours in the same way that some do (see this mani by My Nail Graffiti for an excellent example) but still thought that they looked really cool together against the pale blue base.


I really like this! It was so quick and easy to do, even on all 10 nails! Definitely the quickest mani I've managed on myself for some time (less than half an hour from base coat to top coat!) which is good. I really love doing nail art but it doesn't half take up some time usually! It got pretty messy but I've cleaned up as best I can and I also have ordered some acetone from Amazon so that  I should be able to clean up even better in future.

I'm really happy with this, I love that each nail is different and it looks so cool! This may have just become my go-to mani when I need something quick and easy.

I also realised that I'd inadvertently matched my nails to my bedding, haha!


That's all for now, see you soon!

~Nail Art Novice~

Tuesday, 7 May 2013

Try Something Tuesdays: Colour Blocking

Hi lovelies!

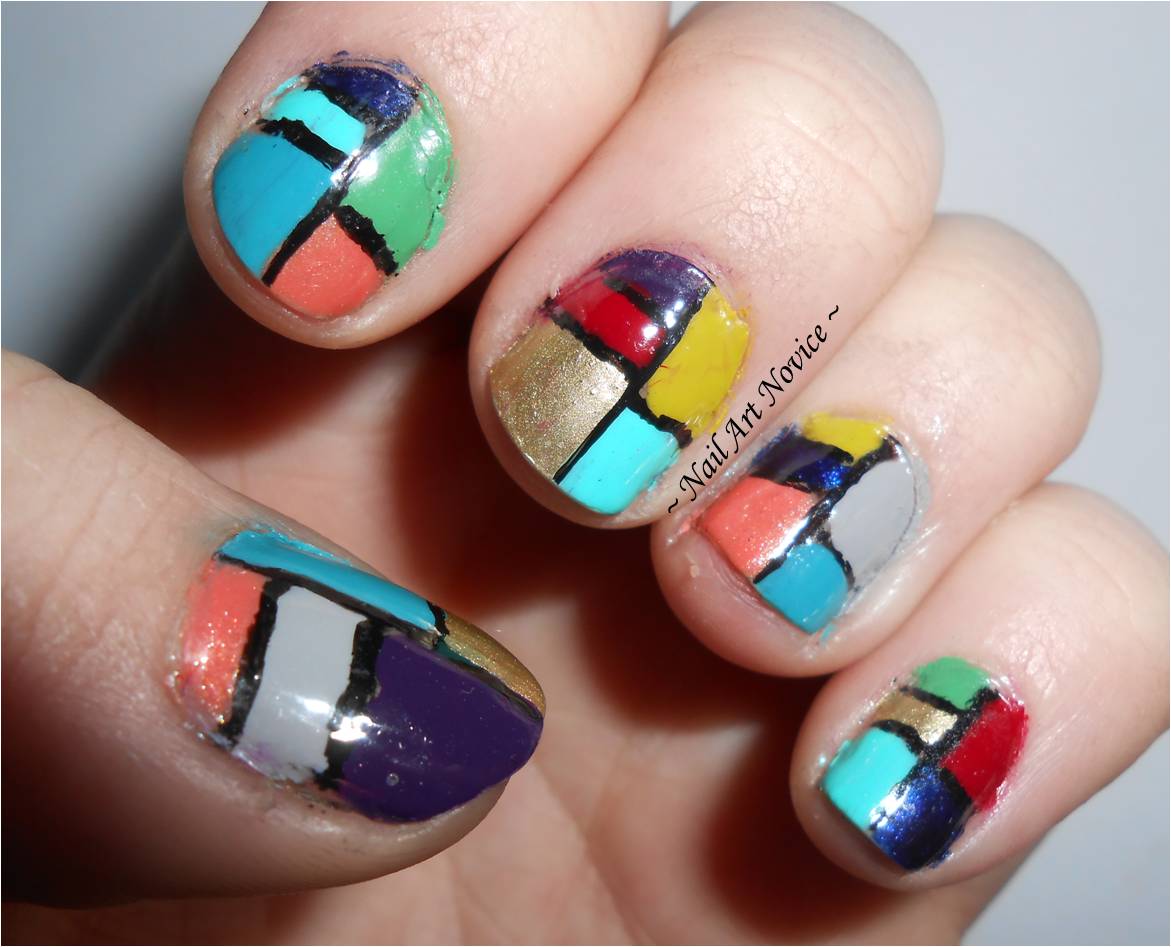
I'm back from Brighton after a fantastic weekend away and have finally had chance to paint my nails again. After 4 days of plain black nails I wanted something colourful and so opted to try out colour blocking, inspired by this design by motelrocks.co.uk which was just something I randomly found whilst searching for ideas. I didn't want to stick to only 5 colours though, so I chose 10 and applied them randomly across all my nails for a ridiculously colourful effect =)

Here's my polishes:


L-R they are: No 7-Siren, Rimmel-Sunrise, Collection-Look At Me! (Apparently they're no longer Collection 2000, I'd not even noticed!), Essie-Mojito Madness, Barry M-Greenberry, Collection-Electric Dreams, Barry M-Navy, Barry M-Plum, Revlon-Hazy and Barry M-Gold Foil. I also used my black Barry M nail art pen for the lines.

Because I knew I wouldn't be able to get them very neat otherwise, I drew the lines on first, filled in the boxes with colour and then went over the lines again which took ages but I didn't have anything to do so it was fine. There's a couple of holes on my right hand but otherwise it worked quite well! Here's the result:


I think my favourite of all is my left index finger, I just really like the combination of colours. I love the look, it's so bright and cheerful, especially after a weekend of dreary plain black nails (I missed my nail art!). Colourful nails are so much more fun =)

In other news, I'm thinking of cutting down these Try Something Tuesday posts, I want to try more nail art and they limit what I can do really, especially if sometimes I just can't be bothered to do something complicated and want to go with something more simple/that I know I can do. I won't stop them completely because there's still things I haven't tried (gradients, marbling, etc etc) but I won't be doing them every week from now on, so I've got a bit more freedom to post!

Hope you all had wonderful weekends enjoying the beautiful weather!

~Nail Art Novice~

If you want to know more about what I got up to in Brighton, I've got a post on my other blog about it.

Tuesday, 16 April 2013

Try Something Tuesday-Full Nail Water Decals: A Disasticure

~Before I begin I just want to wish Rara a very Happy Birthday, coz it's TODAY, Yay!~

PIC HEAVY POST

So the other night I went out to a comedy gig for Rara's birthday, and I wanted to co-ordinate my nails with what I was wearing-my beautiful black and white polkadot rockabilly style dress. I've done plain black and white spotted nails before and wanted something different so I chose some fun spotted full nail decals from YRNails which I thought would look pretty good. I watched their 'How To' video along with Lisa from Geordie Nails' tutorial video (which is really helpful if you've never applied full water decals before!) and got all my equipment ready to go. 

I started by painting my nails (badly) with two coats of Revlon-Black Star which is a lovely black with a silvery shimmer running through it to give a base colour if I needed one.


Then I set about applying my water decals and...here's where it all went wrong. Now I'm definitely not blaming the decals for this, I've seen lots of people use them well and get great results, I think it was my atrocious technique that was to blame for the mess they ended up in. 
Firstly, let me show you how they were supposed to look, with a little help from the lovely Wendy from Wendy's Delights:

Find her superior review of these decals here

I'm a bit ashamed of how badly mine do not look like the ones above really. Any how, here goes:

They don't look so bad from a distance do they?

Up close though you can see that I really did a terrible job!

And don't even get me started on my right hand!

I experienced SO many problems with these that I don't really know where to begin. I think my nails on my right hand were a little short (thanks to my Sheffield trip) because I struggled to get rid of the excess decal on my index and middle fingers simply due to how close to the ends of my fingers the nails are. Obviously I didn't cut them down as well as I could either, I didn't want to take too much of the widths so that I wouldn't end up with bald patches, but I should have been less cautious and they would have fitted my nails much better.

However even with the sizing difficulties I didn't manage to get these to stick to my nails at all. I followed all the directions to the letter, but they just sat on top of my nails and slid about no matter much I tried to get them to stay put by smoothing them into the corners. Even my right hand ring finger (which is probably the only one I cut to the correct size!) didn't stick down on its own, I ended up putting a layer of top coat underneath them all to hold them into place! I don't know what I was doing wrong. I also covered them in layers of topcoat, and they still lifted away from my nails.

As you can see only two of these are completely flush with
my nail! 

I ended up with lots of rough edges, lifting sections and creases and they just didn't look very nice. I went for a shower about an hour after putting these on and they all just lifted off so much that I just peeled them off in the end.

This happened just from picking up my towel! They all ended up
like this though =( =(

I'm really sad I wasn't able to make these work for me! I think they have the potential to look so amazing, and all the other blogs I've seen with people wearing them have been beautiful, I've never seen anyone else have this amount of problems. I am determined to try these again and get them to work, but maybe not for a while because I'm so disheartened by this first attempt =( I think next time I'll try them over naked nails to see if that helps, and obviously cut them down better.

In the end, because I was running out of time to get ready for the evening I ended up wearing something very simple (but lovely) over my Revlon base-two coats of Absolut Lacquer-Mrs Claus' Night Out. Although this is technically a Christmas polish, one of the reasons I bought it was because it had the potential to be used all year round, and I was right! These pictures were taken the day after so there's a bit of tip-wear but they're still in better condition than my decals were! I really like this combo =)


So there ends the sorry tale of my first attempt at full nail water decals. I hope you've at least enjoyed looking at my total failure, and if you have any hints or tips as to how I can make them work for me, please let me know in the comments!!

~Nail Art Novice~

Tuesday, 9 April 2013

Try Something Tuesday-Splatter Mani

Hello lovelies, I'm back! I had a lovely time in Sheffield (so much so I didn't want to come home!) but my nails have suffered badly for it. Hoping to get back into the swing of blogging this week though, just with stubby nubbins!
So with no further ado, here's today's Try Something Tuesday splatter mani! This was, without doubt, the messiest thing I've ever tried to do with nail polish, but it was also quite fun and the end result has turned out pretty cool! I started with a base of Revlon-Sunshine Sparkle-a gorgeous pale yellow with silver sparkles shimmering through it, that I've wanted to wear ever since I found it in the pound shop a month or so ago. Sadly, it took me 4 coats to get it anything approaching opaque, so I'll probably layer it over a white next time I use it!


Then I splattered over the top (by blowing polish through a drinking straw) with Essie-Mojito Madness (my new absolute favourite green polish!) and Sally Hansen Complete Manicure-Himalayan Blue which have combined to make a messy splattery spring themed mani:


I think I prefer my right hand to my left because the splatter is a bit more sparse as opposed to large blobs of colour. I almost removed my left middle finger to do it again but couldn't be bothered to faff with the yellow base again. I think my left little finger and right thumb are my favourites-they both have a good even distribution of both the colours.

Overall-I really like this. It's a really messy technique and takes ages to clean up, but the effect is so random and crazy that it's worth it. Plus there are limitless combinations of colours you could use, and some of them would look AMAZING. I'll definitely be doing this again in the future!

It's good to be back =)

~Nail Art Novice~

Tuesday, 26 March 2013

Try Something Tuesday-Stamping!

As I mentioned yesterday, I'm not going to take off my lovely Magic Croisette manicure until I absolutely have to, so I needed a way to upcycle it for today's Try Something Tuesday. Cue my first attempt at stamping on my own nails (as opposed to falsies-on-sticks or whatever they're called) now I've got my new plastic scraper (thanks to a giveaway prize from The Sorting House, yay!).
I thought I'd stick with the celestial theme and chose a moon and stars image and a twinkly starry one. My stamping plates are unbranded and un-numbered-I got them from Ebay with a basic stamping starter kit so they're not the best in the world, but decent enough for me!

You can see how scratched up the plate got with the metal scraper!

I used L'Oreal-Valiant for my stamping because it's quite opaque in 1 coat, and I don't have any proper stamping polishes, and I thought the silver would look nice against the blue.
(I will apologise now for the tip-wear visible in these photos-I basically spent last night rearranging all my books and DVDs on my shelves and tidying my desk, so my nails took a bit of a battering! But hey, I can cope with a bit of tip-wear if you can!)
I just stamped one image onto each nail at first (following this picture tutorial from Nail Art 101):


but then I decided that they looked a little plain (not to mention wonky) so I went back and added more afterwards-giving me more chances to perfect my technique!


You may be able to see the silver splodges on my hand
from the spillage disaster I had all over myself and my lovely desk-
annoyingly if I hadn't have tidied it it wouldn't have got on the wood!


They're not perfect, plus they were a faff to try and photograph-I don't think my camera likes subtle designs! Overall I'm pleased though, I don't think they're that bad for a first attempt. I've since discovered this really helpful video from soguesswhat11 which I will definitely be following next time I have a go.
I really like the patterns on my thumb, forefinger and right little finger (which I don't have a photo of, sorry!), I think they came out really well. As I said, not perfect, but you can definitely tell what they are! I also love that Croisette's beautiful shimmer is still coming through really well.

And so ends my first stamping adventure!

~Nail Art Novice~

NB Sorry if this post is a bit rambly/non-sensical, I'm somewhat sleep deprived and a bit loopy coz of it. But at least my shelves look good!

Tuesday, 19 March 2013

Try Something BLUESday-Fishtail/Plaited Mani

Ha, sorry, I can never resist a terrible pun. This was what I had planned a couple of weeks ago when I was ill but never got around to it-my first fishtail mani! (Incidentally when did we stop calling them plaits? That's what this reminds me of, plaiting my hair as a youngster when it was still waist length.)
I found this tutorial on Youtube by MissJenFABULOUS a while ago through someone's blog and used that for references when I was doing my practices. Once it came to the real thing I just went for it because it's actually pretty easy to know what you are doing-just a matter of using the colours in the right order each time.
Polishes used were Revlon-Silver Screen, Rimmel I Heart Lasting Finish-Azure and Barry M-Navy which look SO good together, IMO. But then I'm a sucker for blues (and greens) so I would say that. I only did fishtail accents because I thought it would take forever to do a full hand, it's not a quick technique that's for sure! I really love it though.


I really love this technique and this mani. I love how it's such a simple technique but it looks really complicated and how it makes what would otherwise be something plain and boring into something really interesting to look at. This would look completely brilliant on a full mani, if I had the time and patience to execute it properly. I'm a really happy Novice this week! So much so that I am going to enter this into The Crumpet's March Amateur Nail Art Contest-a happy coincidence that the theme for this month is simply 'Blue'. Go and check out some of the other awesome entries too, and come back and vote next week if you like 'em.

~Nail Art Novice~


Tuesday, 12 March 2013

Try Something Tuesdays-Water Decals

I recently discovered YRNails water decals on Geordie Nails' blog and decided to treat myself and Rara to some (although Rara has only just discovered this and doesn't know which ones I've got her yet =p) because they have some really awesome designs but at prices which won't break the bank.
I got both the transparent designs and some full decals but this mani uses the partial ones, and I'm leaving the full ones for a braver day!
I had a couple of practises and they're fiddly little things so not great for someone like me who's clumsy and uncoordinated but I managed. They're not perfect but they still look really cool.

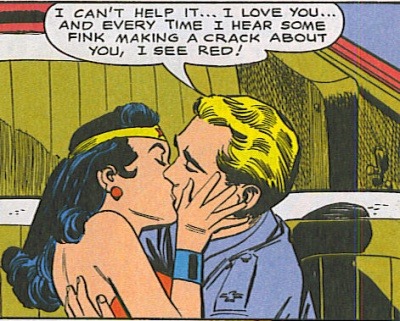
I chose these comic book style 'Pow' ones for my first time using them, and put them over what I consider to be "classic" comic colours-black, white, red, yellow and blue

Like this...can't understand how he's talking AND
kissing her at the same time though...
(Via)
Polishes used were the usual suspects: L.A Colors Art Deco-Black, Colour Me-Colour Me White, No 7-Siren, London Girl-Shade 148 and Barry M-Cobalt Blue.
I didn't want to waste a decal on a black polish so I did something a little different on my accent nails.


I was going to write 'POW' in my bubble but my nails are just too
teeny & I'm not that skilled! I like the exclamation mark too though.


I think these decals look really cool and I'm loving the retro feel to this mani. I was expecting them to be sticky once you removed the backing paper from them, but they aren't which means you can move them around until you are happy with their placing and then top coat the hell out of them to get them to stay there. They're not perfectly flat on my nails but I think that's more because I didn't cut them out perfectly so the edges have lifted slightly/because I didn't dry them all very well. You get 18 designs per pack, so I still have enough left to do a full mani if I wanted to-very good value for money at a pound a pack!
I think they're brill and will definitely be buying from them again in the future, as well as trying out my full patterned decals at some point too.

~Nail Art Novice~


Ooh and as a bonus here's a picture of one of my practice attempts over my mint nails:

I thought he was too cute not to share really.

Tuesday, 26 February 2013

Try Something Tuesdays-Saran Wrap Mani

Try Something Tuesday has rolled around again and I knew exactly what I wanted to do-Saran Wraps-but boy did I underestimate how annoying these would be to get right. I ended up redoing my left hand completely half way through which made me pretty grumpy and I almost wanted to give up on the whole thing. I'm glad I didn't though, I do actually really like the effect even if it was a pain in the bum to get right.
In the UK we don't seem to have access to this mythical Saran Wrap (I don't think) but I watched a couple of videos and it looks like a cross between cling film and cellophane (in that it stays rolled up in a ball if you scrunch it, but is definitely a bit crinklier and not as sticky-to-itself as cling film.). I went hunting around my kitchen for something that would work as effectively-cling film, kitchen foil and kitchen roll were my chosen subjects, and in the end I didn't use any of them! Cling film seems to be too smooth when it's scrunched up, it forms a ball that doesn't have enough rough edges to pick up the polish, foil is good but too sharp in that it punched all the way through my base colour as well, and kitchen roll is useless and fluffy.
I know I've read Saran Wrap tutorials where people used bits of old carrier bag, and was just about to go downstairs again (NB I do my nails in my attic bedroom, the kitchen is a long way away!) to liberate one when I saw something in my room that might work-bubble wrap! Now while it doesn't stay scrunched up in little balls like the rest, I ended up using this because it seemed to give the right effect as well as some slightly interesting patterns from the bubbles themselves, and it was a relief to find something that actually worked properly. I will probably try with carrier bags in the future though.

On to the mani. I knew I wanted a red base and wanted something that would work well with it rather than contrast against it for my top layers so I chose gold and silver metallic polishes. I used Number 7-Siren for my base, it's a very luxurious, proper red colour and applies very nicely. On top of that I used Loreal-Valiant and Colour Me-Pure Gold. These two look lovely together, as neither is a true gold or silver-Valiant is more of a metallic shimmery gun metal, and Pure Gold is a bit tarnished, less yellow than an actual gold colour.


Taken without flash to show that you can see the gold too


These were quite difficult to photograph, think the pattern is a little bit subtle for my camera, nevertheless I did my best. I was going to do the pattern the other way around on my thumb but decided in the end to freehand triangles onto them for ease (and because it was now 1am by this point and I couldn't be bothered any more!)


Overall then, I do like this technique, it gives interesting an fun patterns that are still delicate and subtle enough not to overwhelm, I'll definitely be doing it again only hopefully with less faff next time! At least now I know what works and what doesn't, I guess. I've seen some awesome ones with two layers of colours used on top which also look pretty cool, so I might have a go at that at some point too.

Edit 27/2
Actually the longer I wear this the more I like it, it's really quite pretty in bright light and every nail is different and in dull light you can tell there's a shiny pattern but it's not overwhelming. Ticks all the boxes, will definitely be doing this again!

~Nail Art Novice~

Tuesday, 19 February 2013

Try Something Tuesdays-Striping Tape

It's time for another Try Something Tuesday post, hasn't time flown since the last one?
This week I'm trying out another really easy technique-using striping tape to create patterns on my nails.
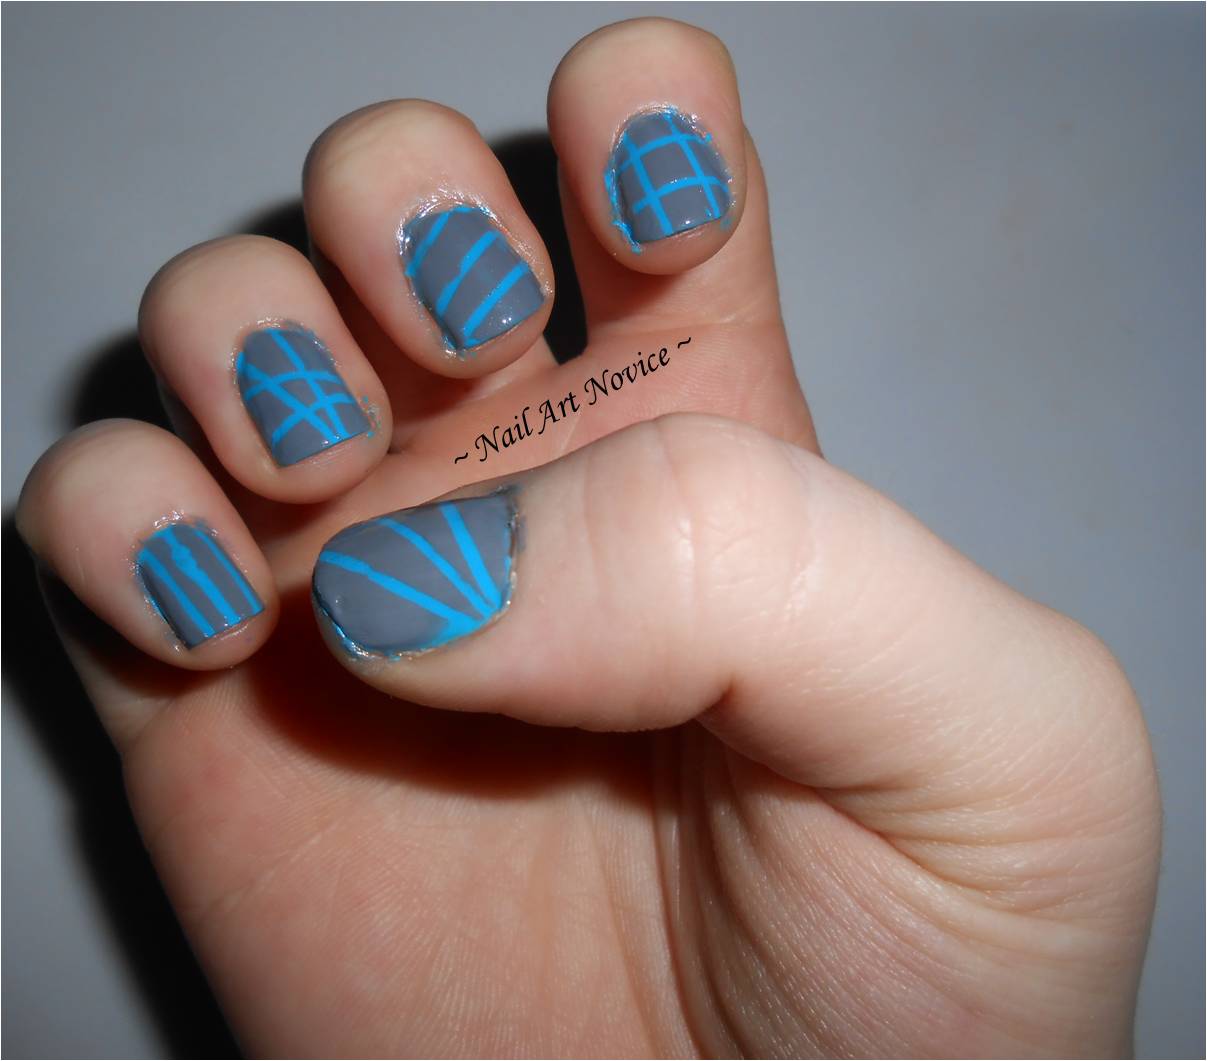
I started with a base of Sally Hansen Insta Dry Brisk Blue which is a frankly AMAZING bright bright blue colour on its own. I had originally planned to team it with Sally Hansen Hard as Nails Xtreme Wear Going Green (from this post) but once I saw it on my nails I realised that the two together would be a bit too clashing and wouldn't really work very well, so I stuck to the one colour in the end.

This is two coats.

It's such a fantastically bright colour-dazzingly blue, it's amazing! The brush was really wide too-I managed to cover most of my nails with one swipe up the middle which doesn't happen very often. Dried pretty quickly too, as its name would suggest. Then I added my striping tape one nail at a time and covered it with a layer of Topshop's Cloud, a creamy grey polish. The first nail I did lifted off all the blue as well, so I went back and topped them all with a coat of Seche Vite and allowed it to dry before trying again. This was much more successful, although I still ended up getting better with practice-hence why you're getting pictures of my right hand today, it's a little neater than my left. It also has slightly longer nails due to cheese slicer related incidents.


Above two pictures taken with flash

Natural Light

I did a different pattern on each of my nails just to try them all out and see which ones I liked.I think I prefer the abstract one on my ring finger and the vertical lines on my little finger the most. It's weird just how much the grey has dulled the amazingness of the blue underneath, it almost looks more turquoise than bright blue now. They're not perfect, but I do think they look quite cool in bright light, in duller lighting they just look kinda tealy/grey and you can't really see the patterns. I almost decided to change my top colour for my right hand, but thought this would probably look even more peculiar so I stuck with the grey and overall it's turned out OK. I wish I had a paler grey though, it might have looked a little better.
Still the technique is pretty easy and not too time consuming for an effect which looks quite striking-I'll definitely be doing this again with different colours.

~Nail Art Novice~


Tuesday, 12 February 2013

Try Something Tuesdays-Going Dotty!

I want to introduce a regular feature to my blog, even though it's only just about a month old. I'm so new to this game that a lot of techniques and styles that seem to be common place to a lot of nail bloggers are still completely alien to me, and I want to get better, I want to get good at this. So I decided to utilise the expertise of my fellow bloggers and start Try Something Tuesdays. Every Tuesday (I hope) I'm going to find a tutorial for a new technique I haven't attempted yet, or a mani I want to attempt to recreate, or even something I want to do from somewhere inside of my own head and try it out, and then post the results. Some might work spectacularly, some might fail in a smeary blobby mess, but I'll keep persevering. I'll keep trying and trying again until I master everything that I want to master and evolve from a Novice into a proficient nail blogger. This is the hope, anyway.

I'm going to start this on my very first week with a polka dot manicure to match my gorgeous black and white rockabilly dress I might be wearing on Valentine's Day (which can be found here on Ebay as I don't have a picture in it yet)

I know this is (in theory) a spectacularly easy thing to master, but I think getting the right number and size of dots is going to be the tricky thing for me-I'm not very good at getting them consistent yet and my practises have ended up looking a little crazy. I'm going for a simple straight line pattern, rather than placing them randomly and hope it turns out a bit better.
I originally was just going to do black and white and keep it monochrome, but my black nail varnish isn't the greatest quality for dotting and I fancied a little splash of colour on my accent nails, which now looks a bit bonkers but I kinda like it.

Polishes used were: Number 17 Fast Finish in Nightshade, Colour Me in Colour Me White, Rimmel I Heart Lasting Finish in  Block Your Green, Marks and Spencer Nail Colour in Blue (that, can I add, is definitely more purple), Number 7 in Siren (red), and Barry M in Cobalt Blue (which is getting a lot of use at the moment, but I shall try to give it a rest soon). I painted my accents (thumb and ring finger) white, and the rest of my fingers black, then pulled out my dotting tools.
Here's the results:

What's annoying is that I did actually bother cleaning up today.
Clearly I forgot my little finger *shakes fist*


Actually, I quite like them. They do look a little bit mad if I'm honest, and are probably a bit Lichtensteiny rather than true polka dots but they're an improvement on my practises in that they're all roughly the same size and a lot more evenly spaced out. Next time I try this I'll probably opt for the next size up dotting tool and make fewer bigger dots, rather than more smaller ones, as I think it'll look a bit neater overall. For my first Try Something Tuesday though, I'm happy, plus I think they'll look awesome with my dress if I actually get to wear it!

~Nail Art Novice~


Related Posts Plugin for WordPress, Blogger...