Showing posts with label China Glaze. Show all posts

Friday, 31 October 2014

Happy Halloweeeeeen!

Hello lovelies and a Happy Halloween to you all!

This is my Polish Party mani for this month because the theme couldn't be anything other than Halloween, could it! I couldn't pick a single theme for this one so just did a skittle-it was lots of fun.

Base colours: W7-Black, Moyra-#63, China Glaze-But Of Corpse and Stop That Train! (both from my Coloristiq box) and Barry M-Matt White.
Glow In The Dark toppers/colours: Violet Rose Polishes-Es Paradis and Amnesia, Dark Metal Lacquer-Beings Of Light and BK Polishes-#5, #6 and #10.

I used vinyls from She Sells Seashells for the pumpkins/bats and freehanded the rest!


I kinda love my little ghostie's reflection ^_^
So there we go! Hope you all had a good Halloween and didn't get too many tricks ;)

Check out the other spooky manis in the Inlinkz!

~Nail Art Novice~


Monday, 27 October 2014

Glitter Me Monday: China Glaze-But Of Corpse

Hello lovelies!

I got this lovely polish through Coloristiq and when I added it to my wish list I had this exact mani in mind. All in all it was quite quick and simple to do-two coats of But Of Corpse and then the rest I did with my Barry M nail art pen (and a couple of dots of Coconut for the eyes). BoC has a fairly matte finish so I added a matte topcoat to finish everything off and Voila! Adorable Frankenstein's monsters! I thought they were quite fitting given the name =p


I don't think the real Frankenstein's monster would be quite as chipper as these ones are (he was a bit angsty in the book) but I think they're cute! And I really like that green (of course I do, haha!)-I'm sad I have to give it back in a couple of weeks.

Happy Monday!

~Nail Art Novice~

Wednesday, 22 October 2014

Coloristiq Polish Rental Service

~PIC HEAVY POST~

Hello loves! Something slightly different today.

I recently heard about a new service called Coloristiq which is a polish rental system based in the UK-they've just started up. They had a promotion where the first 5 people to sign up to their website would get their first three months free and I was lucky enough to be one of them, which has allowed me to try it out!

Basically, this is how it all works:

So that's what I did! The service costs £14.49 which includes postage to you as well as return postage, and "renting" three bottles for 30 days. You can use each bottle up to three times as a full mani (two coats on each finger) so in the 30 days you can do up to nine manis with the polishes in your box. 

This is how mine came:


There's also a return postage label at the bottom of the box too. The box is a nice size-it fitted through my (tiny) letter box just fine so you shouldn't have to do any waiting around for the postman to bring your goodies.

They have loads of high end polishes to choose from-Essies, OPIs, China Glazes and Morgan Taylors (which is a brand I haven't heard of but I'm looking forward to trying!). I spent a good while googling swatches to make my wish list (as the site only has bottle shots, which aren't always the most helpful!). 

So let's see what I got this time around:

Side note-I LOVE that holo rainbow =D
When you make your wish list you can make some of the polishes 'priorities'-i.e ones you really want to get in your next box, and you can have up to three of these. I only added one (But Of Corpse) because I enjoy the surprise of not knowing what I'll be getting. Coloristiq say they will always try to get you the polishes on your priority list as long as they're available, and otherwise the polishes you get will come from your wish list. I haven't had chance to use any of these polishes yet, but keep an eye out for them!

One thing I do like about this service is that they won't take the payment for the next box until you have returned the first one, which means you won't have any direct debits coming out without you knowing about it in advance, and there's no extra costs to pay if you keep them longer than the 30 day period (providing you don't use them more than the Fair Usage amount!). Also because the return postage is paid you don't need to find time to go to a post office-you can just post the box in a normal postbox.

If you have any questions about Coloristiq then their FAQ page is quite comprehensive, or you can just email them-I've found they're quite friendly and happy to answer questions about the service! I think this is a really good idea for newbie collectors who might be unsure about buying expensive polishes without trying them or for people who just don't have the room to have an enormous collection of all the polishes they want. I'm really looking forward to trying the ones I got this month and seeing what I get in the next!

What about you, will you be trying it out?

~Nail Art Novice~

Coloristiq Links:

Monday, 29 September 2014

Glitter Me Monday: Autumn Glitters

Hello lovelies!

I've been a very lazy blogger and not posted anything all week, oops! I did do my nails but just couldn't find the motivation to sort the pictures out and get them uploaded =(

BUT I am back and will hopefully be getting them all sorted and up here over the next week to make up for it so YAY.

For today's GMM I used lots of autumnal polishes/glitters-I LOVE autumn and so this mani made me very happy! I did some gradients using the Barry M autumnal gellies in Mustard, Paprika, Chilli and Cocoa. On my accents I used a coat of China Glaze-White Cap and then added some autumnal leaf nail vinyls which were from Make It Stick Designs. On my other fingers I used a variety of Autum glitters-Tara's Talons-Chocolate Orange, Nelly Polishes-Prototype and Absolut Lacquer-Falling Leaves.


What do you reckon? I kinda love these if I'm honest, they remind me of scrunching through leaves and large mugs of warming drinks. I love these sorts of colours together and they went together really well in the gradients.

What's your favourite season?

~Nail Art Novice~

Thursday, 28 August 2014

31 Week Nail Art Challenge 15-Delicate

Hey loves =)

Originally the only thing I could think of for this challenge was stamping as I have some fairly "delicate" looking flowery stamps on my MoYou London Pro plates but then I remebered the saran wrap (cling film!) technique and was really glad I did. Delicate to me implies girly, pale colours so that's what I used! My base was Barry M-Vanilla, which is one of their matte range from last autumn, and a pinky-nude sort of colour. On top of that I did a saran wrap mani using Barry M-Prickly Pear, Tara's Talons-Christmas Fairy and Revlon-Silver Screen. I then topped it all off with some China Glaze-Fairy Dust for a little added sparkle!


Now this is really really girly and subtle which means it's not like any of my normal manis at all but I really like it! There's something about the shiny shimmeryness of it that really catches the eye and I think all the layers of colour have added up to be a really nice colour. I reckon this would definitely be work appropriate but with that little bit of sparkle it's quite glam too!

What do you reckon? Do you like Saran wrap manis or loathe em?

~Nail Art Novice~

Saturday, 12 July 2014

Guest Post-The Fancy Side

Hello All, 

My name is Amy and I blog over at The Fancy Side (www.fancysidenails.com). Jenni and I belong to the same FB group for polish bloggers and she recently asked for Guest Posters so of course I volunteered. It's a fun way to make new friends, so here I am. YAY!

For my guest post I wanted to do something that is very me, and if you visit my blog, you can tell stamping is my thing. I started off with a base of Zoya Binx* which is a lovely berry pink jelly based polish filled with iridescent glitters. This is from their recent Bubbly collection and let me tell you, I'm in love. 


Once Binx was dry I stamped over it using China Glaze Passion, my go to for gold stamping. I used the new Pueen Buffet plates, which really are a buffet of images to chose from. These images can be found on Pueen 59. 


I hope you enjoyed this look! Thanks for having me on your corner of the internet Jenni! Be sure to come visit me at The Fancy Side sometime, I'd love to have you. 

Enjoy & until next time, Amy Lee

Wednesday, 9 July 2014

Guest Post-Lovely in Lacquer

Hello Jenni's lovely readers!

My name is Abby and I'm from Lovely In Lacquer, and I'm so happy to be guest posting on Jenni's little piece of internet today.

I wanted to create something fun and summery for her readers so what's brighter than neons? I created a distressed manicure using China Glaze Flip Flop Fantasy as a base, followed by dry brush strokes of China Glaze Shocking Pink, Zoya Trixie, and Wet N' Wild Black. Everything is finished off with a coat of top coat for maximum glossiness.


I hope you enjoyed my little guest spot and are excited for Jenni to come back.

Thanks so much for reading!

Tuesday, 21 January 2014

It's Behind You!

On Saturday my family and Rara's family went to see the last night of our local pantomime-something that's become a bit of a tradition in recent years. I know they're not for every one but I love a panto-they're just wonderfully silly and I think they have something in for everyone! This year's was 'Jack and the Beanstalk' so I did some appropriate nails.

Polishes used: Gradients- Rimmel-Mermaid Green, Camouflage and Jaded Glamour with a topping of China Glaze-White Cap for added shimmer. The beanstalks were done with the same polishes on a base of Revlon Chroma Chameleon-Gold. I have to say I'm a bit disappointed with these duochromey polishes-they look like they have so many colours in the bottles but I've not found they translate onto the nail at all! Boo!

Anyways, pics!


I loved these-they were SO GREEN =D Made me very happy, although they didn't last very well, and the panto was huge amounts of fun, oh yes it was!

~Nail Art Novice~

Don't forget to enter my giveaway if you haven't already!

Tuesday, 26 November 2013

November Tri-Polish Challenge 3

Hello lovelies! I hope you all had good weekends. I had hoped to get my Doctor Who mani uploaded but I just never got round to it-but I loved the episode! It was wonderful =)
I'm back with the third installment of this month's Tri-Polish challenge-where you do 4 manis with three polishes. This months colours are grey, blue and purple and my polishes are L'Oreal Color Riche-Metropolitan, Rimmel-Aqua Cool and Barry M-Prickly Pear.
This time I've gone for a gradient, along with a topping of China Glaze-Fairy Dust for a little bit of sparkle.


I'm kinda disappointed that these didn't blend together better-you can kinda see it on my thumb/little finger in the bottom picture but for the most part I've still got three distinct lines. Oh well, can't have it all can you, they're still quite pretty!

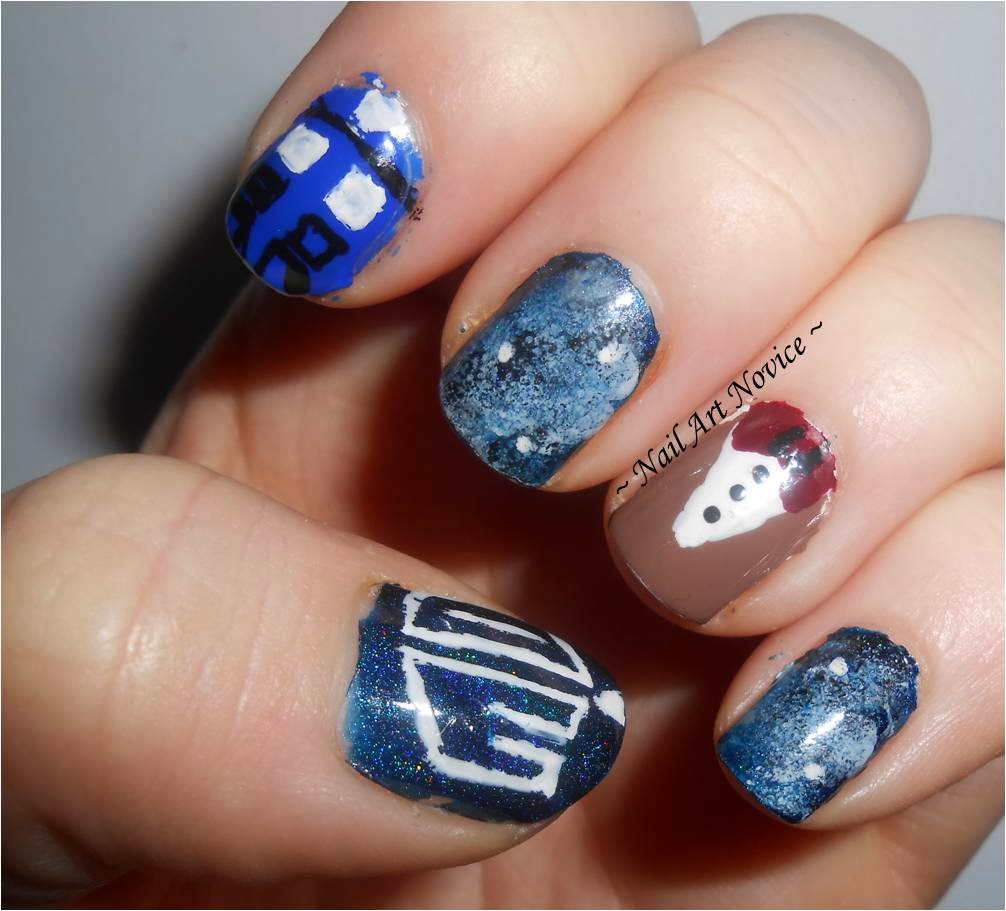
And as a bonus, here's a picture of my Doctor Who nails, just because I can...please excuse my dodgy TARDIS, I was rushing at this point because it was nearly time for the episode and I didn't want to miss it!


Isn't that blue holo (thumb) gorgeous? It's Smitten Polish-Bifrost if you're interested.

I'll be back on Thursday with mani number 4 for the TPC, tata!

~Nail Art Novice~

Thursday, 26 September 2013

Mish Mash Challenge Week 9-Blue

Hello again!
Time for another Mish Mash challenge and I was rather looking forward to this one as I have a LOT of blue polishes-almost 30! I was originally going to try and use them all in today's mani but decided that would take forever so I randomly chose 10 instead. (By randomly I mean I stuck my hand in the box and pulled them out without looking, haha).
Polishes used: Barry M-Matt White, Guava, Denim, Rimmel-Midnight Blue, Aqua Cool, Royal Blue (Metal Rush), Maybelline-Dark Denim, China Glaze-For Audrey, Avon-On Point Blue, Sally Hansen-Himalayan Blue and Revlon-Royal.

 I decided to do a mosaic/colour blocked mani to show them off to their best potential so started with a white base and some striping tape, then added each colour semi-randomly to my nails.


(Kindly ignore my higgeldy-piggeldy nail lengths and shapes!)
I really like this, it's very me and really quite simple to do-the longest part was getting all the tape on, man that took forever! Some of the colours have bleached slightly in these photos, they look even better in real life with the contrasts between the colours. One day when I have time to spare I'm going to do one of these using ALL my blues, I reckon it'd look amazing!

Don't forget to check out the other fantastic 'blue' entries in the inlinkz below, and I hope you're having a marvellous Thursday!

~Nail Art Novice~

Thursday, 22 August 2013

Mish Mash Week 4-New Nail Art Technique-Take Two!

OK, so I really didn't like what I'd ended up with in my first attempt at this week's challenge, and definitely didn't want to keep it on my hands for long. As I started removing it (shortly after I'd finished the post, if I'm honest), I started looking through some of the other wonderful manis done for this week and I came across this wonderful post by A Polished Prance showing the 'drag marbling' technique which looks really fabulous. I decided to try it out on my thumb to see if I could do it and it looked really cool! I then decided this was going to be my second 'try something new' mani, in the hope it would come out a little better. Thankfully, it did!

Polishes used are the same as before with the addition of Barry M-Matt White and China Glaze-Fairy Dust because I fancied adding a little sparkle. I just followed the same video tutorial that Chantelle linked to in her post and it was really quite simple and easy =)


I did struggle a little using my non-dominant hand, simply because holding the needle was a little fiddly but I still really like the end result MUCH more than I did with the acid wash-it's really bright and fun and funky. This one definitely won't be getting taken off straight away! Thanks to A Polished Prance for the idea!

Again, don't forget to check out the inlinkz,  it just goes to show you never know what you might find as inspiration =)

Until next time!

~Nail Art Novice~

Friday, 21 June 2013

P P P P Pick Up A...

Hi all,
Just a quick post before I leave for Sheffield (my second home!) for a couple of days. Obviously this was supposed to be part of the ABC challenge but I've had an awesome idea for X which will take me AGES to do if I manage it, so I'm dedicating Sunday to that. In the interim I've thrown this one together really quickly with some bright colours and penguin accent nails-penguins are my favourite animal, they're just TOO CUTE.

All polishes are Barry M (surprise surprise!)-Black, Matt White, Mango, Passion Fruit, Guava and Key Lime plus their fabulous nail art pens in Black and White. I also added a little bit of sparkle with China Glaze-Fairy Dust.


Haha, I love these little guys, they're so adorable!

Hope you like them too. I'll be back late tomorrow (Saturday) night, tata!

~Nail Art Novice~

Sunday, 2 June 2013

Me, Myself and I-The Ultimate Skittle

Hello!
I found out the other day that one of my favourite nail art blogs-Nailed It NZ- is having a nail art contest (and giveaway!) to celebrate her first year of blogging and I decided I really want to enter (despite the fact that I have little chance of winning looking at some of the amazing entries so far!)
The theme is 'Me Myself and I' and Jessie also says 'Make sure your manicure tells me something about you - I'm interested!.. Whatever you like - I like reading, so feel free to tell me a story about how your nails relate to you!' which I think is a really fun addition to it!

I sat down and had a think about what I wanted to do-you can submit up to three entries so it was a tricky decision! I decided this is what I wanted to do first though.

First-the back story! I am known in the blogosphere as Nail Art Novice because that's really what I am! This time last year, the only remotely interesting thing I did to my manicures was to add Crackle top coat. I started this blog in January and have since then learned a lot more cool tricks-whether that's by following other people's tutorials, getting advice and tips from some of the awesome ladies I've met through the nail blog networks on Facebook or just by playing around by myself to see what I can come up with. I still consider myself to be a Novice though, there's so many things I've never attempted yet, and I think I'll always be one because I'm hoping to keep improving my skills.

For this mani then, to represent me, to represent my blog and to represent my new found passion for nail art I decided to do the Ultimate Skittle incorporating all the different techniques that I've tried since starting my blog. I was originally going to do it in a rainbow of colours, because I really love rainbows, but thought that might start to look a bit too random and mismatched. Instead, I've decided to go with some of my favourite colours-blues and greens, with some silver and gold in there to add some contrast and detail. Quite co-incidentally I've also used polishes from the 3 brands I own the most of-Rimmel, Barry M and Revlon, although that was purely by chance!


Polishes used: Barry M-Navy, Barry M-Teal, Rimmel-Camouflage, Rimmel-Jaded Glamour, Barry M-Gold Foil and Revlon-Silver Screen. The glitter top coat is China Glaze-Fairy Dust and there's also a small amount of MaxFactor-Fantasy Fire and Barry M's silver nail art pen on my left thumb.

Techniques used:
Left hand, little finger to thumb: Dotticure, Striping Tape, Stamping, Gradient, Freehand scarab nail art (inspired by this tutorial by Holy Grail Nails)
Right hand, little finger to thumb: Splatter mani, Fishtail, Fan brush, Saran Wrap, Freehand rose nail art


This was the mess of my work station half way through!

and this was the state my fingers were in!
But it all turned out good in the end!

I really love these colours together in all the various combinations and would definitely wear all of these as full manis. I'm a bit unimpressed with my fan brush this time around, but I think that's more because all of the colours have blended together to make 'generic green' than anything else. The nail I spent by FAR the longest on was actually the stamp-what you can see is my 5th or 6th attempt and my 4th stamp choice and if this one hadn't have worked I was going to do something else! It made me so mad! Luckily it came out well on my last attempt, phew!

OK, I hadn't realised how long this post had got (sorry) so I'll leave you now!

~Nail Art Novice~

Saturday, 4 May 2013

Guest Blog from Pocket Money Polishes

Right now I am in Brighton, doing my final rehearsal bits before my first performance of Titus later, woo!
So last Saturday I was chatting on FB with Charlie from Pocket Money Polishes and really cheekily asked her if she would be willing to do a guest post for me whilst I was away-completely expecting her to say no. To my surprise she readily accepted so I'm sending out a MASSIVE thanks to her. With no further ado, I'll let her get on with it!

~

Hello Nail Art Novice Lovelies!
My name is Charlotte and I have a blog called Pocket Money Polishes. I'm delighted to say that I've been asked to do a guest post for you this weekend-apologise for the intrusion. I'm having a crazy busy week between deadlines, blogging and other projects so I have put together a simple look today using some of my favourite trends and techniques.


First I created a block ombre across my nails (going from light on my thumb to dark on my pinky), I excluded my ring finger as that is my finger of preference for an accent-this I painted white. I used a total of 5 varnishes for this look: Fast Track from China Glaze is a beautiful neutral gold that glistens and has a great textured appearance but is smooth to the touch, it does take a little building up and this photo shows 3 thin coats. Barry M's Mushroom is a grey leaning brown and one of my favourite polishes for the days when I need to have serious nails.Cackle is from George (Asda) and is a fairly standard brown with a good formula for easy consistent coverage. Finally, the darkest brown on my little finger is Roasted Chestnut by W7, which is one of my most beloved polishes with its deep chocolate brown colour and coppery shimmer. To these colour block fingers I added a slightly curved column of white dots to one side of my nail, as always my white is from the Natural Collection at Boots. Dots are a nail art staple and such a quick way to spice up a simple mani.


I painted my accent finger first to ensure that it had plenty of drying time as I was using thin striping tape, and if you don't give your base enough time to dry it will just be ripped up when you remove the tape. I used three pieces of tape, two horizontally across the nail and one vertically down the middle. The next step was to randomly add a square of each colour to my nail, and then while this polish was wet remove the tape. I then added some top coat to smooth the edges and voila-all finished! I am describing this manicure as 'coffee squares' in my head as it has all my favourites-latte, cappuccino and vanilla colours.

Thanks for having me today, please feel free to pop over to my blog and see what I am up to-I am usually up to something!! Wishing Novice luck with her polish buying ban and hope she's having a good weekend away.

Enjoy the rest of your weekend!

 <3 Pocket Money Polishes

~

Yay! Look at those pretty nails =) I love this look, I'm definitely going to try it out myself soon! BIG THANKS to Charlotte for doing this so last minute for me, I'm so impressed that she managed to fit it in her busybusy life! Please do go check out her blog, I'm sure she'll be glad to have you!

I'm back on Monday so normal posting should resume on Tuesday!
I'll see you then

~Nail Art Novice~

Tuesday, 5 March 2013

A Quick and Dirty Mani to Tide Me Over

Firstly let me apologise for not posting much this week and also for not bringing you a 'Try Something Tuesdays' post. Basically I'm really ill-suffering from a horrible head cold that's generally making me miserable, plus I'm exhausted because it's stopping me from sleeping properly. I stuck this on at the weekend fully intending to do a post about it on Sunday but then got hit by the full whack of this thing and had to spend the day in bed. I'm not going to be doing a TST post because I feel like faffing about with noxious smelling polishes wouldn't do me any good at the moment, but I will try and resume normal posting within the week as long as I am feeling better.
This is a really quick and simple mani that's really quite pretty to look at-two coats of Barry M's Black Multi Glitter topped off with two coats of China Glaze's Luxe and Lush. There's a bit of tip-wear going on in these photos because it's a couple of days old now but oh well.


With flash

Natural light

I'm hoping I recover soon now, I've already had to cancel a trip to see some of my uni friends because of it and I'm getting fed up of constantly coughing and not being able to hear anything and feeling absolutely pants all the time. It's knocked me for six, this little bugger, and I am not a happy bunny.

Send me nice things to cheer me up lovelies?? (nailartnovice@gmail.com / @NailArtNovice)

~Nail Art Novice~

Sunday, 24 February 2013

Wishful Thinking

Spring is taking a long time to appear in Britain at the moment and it's really cold. This coupled with the fact that I've got a horrible head cold and am generally feeling a little worse for wear at the moment meant that I wanted something fun to put on my nails that might make me feel a little better. Rara came over the other night and we both decided to do some spring-inspired nail art. We were originally going to do the same thing but had different ideas in the end and did two completely different, but both awesome manis.

Firstly, polishes used:
Rara: Sally Hansen Insta Dry; Brisk Blue, Colour Me; Colour Me White, Barry M; Lemon Ice Cream and L.A. Colours Art Deco; Black
Me: China Glaze; For Audrey, London Girl; Shade 148, Rimmel I Heart Lasting Finish; Tangy Tangerine, Colour Me; Colour Me White, OPI; Suzi Loves Cowboys, Barry M; Mushroom and OPI; Don't Mess With OPI.

Although we didn't copy them exactly, we both took inspiration and techniques from this sky/clouds tutorial by Nailed It NZ and this cut out sunshine one from Gnarly Gnails.

The Manis
I started with For Audrey on all my fingers except for my thumb, which I painted with the yellow London Girl polish. Because I wanted this to be my sun, I sponged some orange on top to change the colour slightly. Next I did the clouds with a dotting tool, then the trees and flowers using nail art brushes and the ones in the polishes. I added a little bit of the lighter brown Mushroom over my Suzi Loves Cowboys to give the trees some texture and stop them being quite so dark before doing the suns as in the tutorial above.


Rara started with a base of Brisk Blue then added the clouds and birds as in the tutorial on all but her accent nails. She painted her suns on using Barry M Lemon Ice Cream which is a paler yellow than the one I used, then added the details again using nail art brushes.


We were a bit bored and messing around and decided that you definitely needed to see some pictures of them both together too (I promise I'm not just crushing her hand in the last one!) and you can see the differences in our nail shapes here, Rara's are much longer and thinner whilst mine are broader but shorter. Both lend themselves well to different styles of art though!


I loved Rara's little birds that looked like they were flying across her nails and the cutout suns impressed me too. I think they look pretty spectacular, both of them, although I'm really sorry to say mine have all but come off now, which is sad. I enjoyed having spring themed nails, even if it was still snowing!

Let us know which one you prefer in the comments!

~Nail Art Novice + Rara ~

Thursday, 14 February 2013

Unlike Men, Diamonds Linger

My polka dot Try Something Tuesday manicure didn't last very long, unfortunately-by yesterday I had several chips and a missing thumb nail, so by the end of the day I had picked them all off*, leaving me with naked nails again.
Wanting something simple to and not requiring too much effort, I picked out two of my unused polishes to combine.
Firstly, I chose Revlon's Top Speed Cloud which is a lovely pale pale lilac. It almost looks grey in the bottle, but with 3 coats on, it's definitely more purple. It was still visibly streaky with 2 coats, so I think 3 is needed. Went on nicely though, and dried pretty quickly.

Forgot to clean up again, rubbish
Then I topped it off with the frankly beautiful Luxe and Lush from China Glaze which is an amazing iridescent flaky glitter topper that flashes green, orange, gold, pink and blue as it moves through the light. It was one of those 'must have' polishes when I saw it and I had chosen it and paid for it before I really even realised.

It's so pretty

There is just no way I can photograph this properly. I even stuck my hand out of the window to try and get a picture in the sunlight (THE SUN. I've not seen it in so long, it's so nice.) but even that didn't show how pretty it is. It's like I'm wearing diamonds on my fingers, they catch the light every time I move and twinkle away. You'll have to take my word for it, it's lovely.
Disclaimer: if you don't like heights you might want to avoid my outdoors photo. I'm in an attic bedroom and literally just stuck my hand outside and took a picture so the ground is a long way away. Thought I should just warn you.

Inside, with flash

Outside in the suuuuuuuuuuun.
Simple, quick and really pretty. I'm happy!

Hope you're all having a good Valentine's folks!


~Nail Art Novice~


*Terrible habit, I know, but I can't stand having chipped nails, and it's something of a compulsion...


Title of post taken from Diamonds Are Forever
Related Posts Plugin for WordPress, Blogger...