Showing posts with label Stickers and Decals. Show all posts

Sunday, 29 June 2014

Rara's Nautical Nails

Helloooo again!

For this mani I used Nails Inc-Big Red Apple, Tara's Talons-Supersoaker and a base of Barry M-Matt White. Also I used the anchor decals from The Vinyl Boutique. As you can see I recently bought some vinyl decals and I have been playing! I have never used them before so I was really pleased with how easy and simple they were to use especially to a complete beginner like me!

I used striping tape to do the lines on the accent nails but as I am very impatient and don't have a fast dry topcoat I always end up pulling the base coat off when I remove the tape and have to fill in the holes I have left behind!

I decided to only use my accent nails for the decals and I am glad I did because I think it makes the design look more striking!


This was a really quick and easy mani to do and I love all things nautical so it made me very happy!

*note to self* buy a fastdry topcoat!

~Rara~

Wednesday, 18 June 2014

Straya Baby!

So this is it! This is my last 24 hours in this country until the end of July which is both exceedingly exciting and also nerve racking!  One of the reasons I'm going to Australia is to meet my boyfriend's parents so I reckon I'm allowed a jitter or two! I know it's going to be a truly amazing trip but I will miss home a lot, I love Britain!

In honour of the occasion I have done Australian themed nails using Aussie flags, their national colours and a couple of adorable marsupials! Polishes used were: Barry M-Navy, Spring Green,  Rimmel-Red Obsession and Revlon-Electric, plus my Barry M white nail art pen. The decals were from YRNails.


I know the Union Jacks aren't quite right but since I only have dotting tools to work with I thought it'd be too fiddly to fill the blue in again, and I still really like em! I'm hoping they last a good few days as I have no idea when I'll next get to do my nails (which feels really weird!). I honestly don't know how much time I will have to post any manis I do do, but never fear, I have lots of guest posts from lots of fabulous nail artists to keep you interested! Also I am going to try and update my manis to instagram even if I cannot blog them, so if you want to keep in touch with me on my travels make sure you follow me over there. Also also, make sure you stick around for when I'm back cos I have a giveaway or two planned, so you don't want to miss that!

Right, that's me for now! I will leave you in the very capable hands of all my guest posters and I will see you soon! Have a good summer my lovelies!

~Nail Art Novice~

Friday, 13 June 2014

Nail Stickrs Review II

Hello! How're you all doing? I'm getting really excited cos I go away to Australia in a WEEK! SO much still to do though, eek!
I've got some more nail art using the Nail Stickrs vinyls (see my first review here) today, also incorporating some texture and my boyfriend's absolute favourite technique-the jelly sandwich. I used the zigzag vinyls, both in a 'tape mani' style and as a stickers to create a skittle mani using Revlon-Silver Screen, Kiko-643 (a gorgeous shimmery green Sugar Mat I picked up in a blog sale a few weeks ago), and Barry M-SLE'13B  for the sandwich (cos my boyfriend really wanted me to use the stickers under layers!).


On my index/ring fingers I started with a coat of Silver Screen and then applied the vinyls on top. They come in a set all together so I just placed them on as one unit and then used tweezers to remove every other strand, which was tricky but doable, even on my off hand! I then applied the Kiko over the top and pulled them off while it was still wet to make the pattern. On my thumbs I did the opposite-started with two coats of the Kiko and then placed the silver zig zags over the top once it was dry-I wanted to see how well they stayed on for. I topcoated over the top of them to secure them, and so far they haven't budged at all, even through multiple hand washings/showers/washing up.


The butterflies are normally silver, but I actually quite like the shade of gold they've turned under the green, and the fact they're still really sparkly, even with topcoat. The vinyls themselves are really easy to use-although a pair of tweezers is always useful to have on hand to help with placement-and I really love all the fun things you can do with them. If you're a newbie to the nail art world you should definitely think about getting yourself some cos they're really easy to use and give you some awesome looking designs  (when we all know they're so much easier to use than they look, but shhh ;) )

You can find Nail Stickrs here: 
  Website | Facebook | Twitter

Thanks for reading! I've got one more design with/review of these coming up this weekend so keep an eye out for that.

~Nail Art Novice~

Wednesday, 11 June 2014

Nails Stickrs Review

~Some items in this post were sent to me for my honest review~

Hello lovelies!
A few weeks ago someone posted in one of the nail groups I am in asking if anyone would like to review some of their nail vinyls and of course I said yes! I received a nice little package last week with lots of goodies in-loads of different designs and lots of fab colours too.


There are two ways you can use these Nail Stickrs-either simply as stickers by painting a base colour on, sticking the vinyl on top and using top coat to secure it. The other way is to use them is as a tape mani-painting your base colour, applying the vinyl, painting another colour on top and then removing the vinyl. I chose to do the second option today with some of the hearts. Nail Stickr vinyls come 'unweeded' meaning you get both the shape and the outline of it-so you can use both!


The base I used for this was the fabulous Mentality-Moody, an awesome mix of black white and bright blue microglitters-I love using fun backgrounds like this for my nail art. I layered 3 coats over one coat of Sally Hansen-Brisk Blue to make sure it would be opaque, then stuck some fast dry topcoat on top (my trusty Seche Vite!). Once I was sure it was dry, I applied the vinyl to my nails and painted on some Barry M-Coconut on top and then peeled the sticker off. I used just one sticker for all 6 of my nails because they're a really good size (3cm x 2cm)


As you can see the hearts came out really clearly, even the tiny ones, and I think it's a really fun look! I was going to add the heart stickers to my other nails but thought it might be a bit too much so decided against it.

I would definitely recommend these vinyls, they're good quality, come in loads of different designs and are a really easy way of sprucing up a plain mani-I'll definitely be taking some away with me on my summer holidays!

You can find Nail Stickrs here:


and you can get the nail vinyls from their site starting at $4.99 for 100, which is a pretty awesome amount!

I'm going to be doing a couple more designs with these this week, so keep an eye out for them!

~Nail Art Novice~

Sunday, 18 May 2014

Rawr!

Hello lovelies! Hope you've all been having wonderful weekends in the sunshine! It's been lovely!
I've got a fun combination today that's really making me smile. I used Tara's Talons-Don't Be Jel (again from my Treasure Trove, although Tara deliberately included it for me as I liked it so much!) and then on my accents I added some awesome dinosaur vinyl stickers from Make It Stick Designs. Nail vinyls are all the rage at the moment and I went browsing through Etsy (dangerous!) the other day looking for some I liked. Make It Stick have loads of choices and also loads of different colours, and I just couldn't resist these little dinos (and a few others too, oops!).


How cute is this little tricey? =D


There are four different dinosaurs in the pack and I used one of each for this mani-aren't they cute?! I have to say I really love this-the base is lovely (jam packed with green and yellow glitters of various sizes) and I am LOVING the dinos too =D

Whaddya reckon?

~Nail Art Novice~

Monday, 23 December 2013

12 Days Of Xmas Nail Art 12-Freestyle Christmas

Well we've finally reached almost the end of December and the end of this little challenge! I'm quite sad to see it go, I've had a fantastic time doing these and shared the experience with some really lovely ladies. Originally my plan was to choose some of their manis to do on my nails today but there have been so many lovely ones that I couldn't just choose 10, and I also would not be able to do them credit at all. So instead I want to dedicate this mani to lovely ladies who have taken part alongside me-there's been over 150 fabulous designs created for the various prompts and I, for one, have really enjoyed myself. I want to say thankyou to everyone who took part with me, whether it was just once or every mani-I never thought when I had this idea in November it would have become something this great! You've all been really awesome company, and I've loved seeing so many different designs. I can't wait to see what you've all come up with for today!

My 'freestyle' mani is made up of various things I've done along the way, and I used about 30 polishes in total for it! I won't list them, most of them have been used in the other Xmas posts anyway, but if there's one you want to know for definite just ask =) Also I used this tutorial from The Little Canvas to do the reindeer.

Here we are then, my final Christmas mani of 2013:


And just because it's Christmas, and I haven't yet, here's some pics using decorations too:


I can't believe it's over! Look out for my round up coming soon, but other than that I would just like to wish you all a very Merry Christmas (if you celebrate it), and I will be back after the festivities have quietened down a little!

~Nail Art Novice~

Tuesday, 17 December 2013

12 Days Of Xmas Nail Art 9-Snowmen

I was looking at my manis for this challenge and realised none of them were particularly in your face bright amazing colours, so I decided to rectify that for this prompt! The base for this mani is the ever beautiful Tara's Talons-Ol' Blue Eyes (over a similar base colour to make it more opaque) and it's just gorgeous. My little fingers have decals I got on Ebay here and then the rest of the snowmen were freehanded all with a dotting tool. Other polishes: Rimmel-Serene, W7-Black, Barry M-Mango and Rimmel-Red Carpet.


When I was doing these I wasn't sure I was going to like them but actually I'm pretty pleased with the way they've turned out in the end! I love the contrast of colours over that blue, think it looks fab!

Rara
Polishes used Avon-Starry Sky, on my thumb is Tara's Talons-I Love Winter and on my ring finger is Tara's Talons-Ice Ice Baby then Paperchase nail art pens. The only problem I encountered was with the I Love Winter...it took me AGES to get any of the snowflakes and stars out it was mostly the polish that came out.
I didn't want to do a conventional snowman as I'd already done one in an earlier post. So I decided to do the main aspects of a snowman...the carrot, scarf and hat. I apologise now about the smudges on my nails...I took the photos after a trip to the pub and also I piggled the skin on my little finger...oops!! So I am including the photo I took before I did my clean up. Only 3 left :'(


Only 3 left :'(
~Rara~

Don't forget to check out the other lovely snowmen in the inlinkz. Also, does anyone else now have 'Do You Wanna Build A Snowman?' from Frozen in their head? LOVE that film!

Until next time,

~Nail Art Novice~


Friday, 13 December 2013

12 Days Of Xmas Nail Art 7-Christmas Animals

OK so I did a very silly thing this week. I'm currently up in Sheffield visiting friends/rehearsing and performing in a show and I brought all my polishes with me to do this mani. Or so I thought. I'd actually (somehow!) managed to forget both my base coat and top coat, which is basically a massive fail for a nail blogger! I had to go out and buy some more and could only find Sally Hansen Double Duty. Don't get me wrong, it's pretty decent for what it is, but man I missed my Seche Vite! I don't know how I ever managed to function before I owned fast dry top coat, because these took hours to feel like they were properly dry, and even in the short time between finishing them and taking the pictures they got a little battered/dinged up. SIGH. Lesson learned there, methinks.

Anyway, enough of my idiotic-ness. I used lots of polishes for this one so I'll zip through them quickly: Rimmel-Red Obsession, Barry M-Red Glitter, W7-Black, Barry M-Matt White,Mango, Mushroom and Lemon Icecream. I also used some reindeer water decals which I picked up on ebay here.


I do think they look better in white but I wanted to try both colours out
So there's my Christmas animals-cute little robins and penguins!

Rara
So for some reason the majority of my Xmas animals are birds! I've done an owl, penguin, robin, reindeer and another robin. Not sure why it was so hard to think of Christmas animals but it was and I was sorely tempted to redo my Christmas pigs!! However I am pleased with how these came out, especially after I added the Santa hats...no Xmas mani is complete without a Santa hat!! Polishes used - base colour NYC-Sidewalkers, Avon-Express Mocha, Tara's Talons-Three Wise Men, Barry M-Matt White, Barry M-Red Glitter and an orange nail art pen. 
Friday 13th...hope it was a lucky nail art one for you all!!


~Rara~

Don't forget to check the inlinkz out for more awesome festive manis =)

~Nail Art Novice~


Tuesday, 22 October 2013

Rock of Ages Nail Art

Last week me and my fella went to London to catch a couple of West End shows and I couldn't resist doing my nails to match one of the shows! These are inspired by Rock of Ages-a fabulously 80s-tastic rock musical. I did some gradients inspired by the show programme, some guitars and some nail art inspired by some of the costumes with the zip decals from the Born Pretty store that I've wanted for aaaages. My boyfriend even got in on the action too!

Gradient: Maybelline-Dark Denim, Sinful Colors-Amethyst, Barry M-Satsuma/Mango, China Glaze-Fairy Dust, GITD music note decals from Born Pretty.
Guitars: OPI-Suzi Loves Cowboys, Barry M Nail art pen in silver
Jackets: W7-Black, Colour Me-Colour Me White, Rimmel-Red Obsession, Barry M- Gold Foil, Zip decals from Born Pretty.


The shows were both fabulous-we laughed a lot, sang along until we were hoarse and had a generally fab day!

~Nail Art Novice~

Thursday, 19 September 2013

Mish Mash Challenge Week 8-Cold

Sooooo...I missed a week of the Mish Mash challenge and feel really bad about it. I keep going up to visit my boyface in Sheffield and then ending up staying longer than I anticipated and missing lots of posts-oops! So today's mani is the new Mish Mash challenge prompt which is cold (co-incidentally ended up very close to 'Hot' in the list!). I wanted something relatively simple so I picked out some 'cold' colours (Pale blue, white and silver) and went at it.
Polishes used: Revlon-Blue Lagoon, Rimmel-Serene and H&M-Silver Frost. I added some wintery tree decals from YRNails to contribute to the effect too.


I actually really like this, it's definitely 'cold' in colour but it's pretty and delicate too. Now I've got the hang of them I really like using these decals, they're such a simple way of sprucing up an other wise boring mani, I think.

I'm off camping this weekend with my fella (Lovely weather for it, ey!) so I might be a bit absent again, but will try and get some appropriately themed nails done before we leave!

See you soon, have a good weekend all!
~Nail Art Novice~

Don't forget to check out the other ladies fab efforts this week:


Monday, 29 July 2013

Rara's Super Quick Summer Nails

Hello lovelies! Rara here again! I'm posting today because Novice is away visiting her friend and doesn't have any internet so you get me instead! I've got a couple of summery designs I did that were pretty quick and easy.

First up-Gradients and stars.

I wanted to try some gradients on my own this time [Novice-last time I did some for her-here]. Me and Novice went to the park in the sunshine and I took my polishes. I used Avon-Forget-Me-Not Blue, Plum Seduction and Make My Day with a Rimmel glittery top coat. 
It was quite difficult to start with as I couldn't get the colours to blend properly, and I'm not sure I managed to get it right on all of my nails. I decided I wanted the colours to alternate so I went from blue to red then red to blue. After that I added some nail stickers that are also from Avon. I was quite pleased with the results and got a few compliments from them too, which is always good!


Next up-a summery dotticure.
Polishes used were both Essie-Mojito Madness and Off The Shoulder. This was just a quick and simple mani-I needed to paint my nails but was just going to bed. I painted each layer in between reading chapters of my book. Super quick, very easy and quite effective!


That's all from me for today but I'm sure I'll see you again soon!

~Rara~

Wednesday, 10 July 2013

B-B-B-B-Birthday Nails!

~Pic Heavy Post~

Hello lovelies, I'm back to blogging again now after an awesome week of fun things! I apologise if I haven't replied to your comments from the past week or so, but I'm getting there eventually-thank you for them all!

As I mentioned it was my BIRTHDAY week last week and so I did some appropriate nail art. For my party evening I wanted to keep it relatively simple so I pulled out my new Dandy Nails-Bory Alice which I bought with a voucher I won in a giveaway. It's a super super pretty duochrome shimmer which changes from blue to purple with a hint of gold in there too. Of course it's nearly impossible to capture properly, but I tried! I also added a couple of birthday-themed accents with Barry M-Gold Foil and Revlon-Silver Screen.


You can kinda see how pretty it is, right? It looked really awesome when it caught the light but I couldn't really get it across well. 

Anyhow. For my actual birthday I went to see Hairspray the musical at my local theatre (Hurrah!) and wanted themed nails (of course!). I broke out some of my new YRNails decals on top of some Barry M-Mango and Matt White and Sally Hansen-Brisk Blue. My thumb nails I adorned with some theatre mask comedy/tragedy faces, done with Barry M nail pens over Rimmel-Red Carpet
These aren't the best as I did them in a bit of a rush so don't judge my sloppy techniques! I did chequerboards using my Barry M nail art pen to represent the shoes Tracy (the lead character wears) throughout the show. The bow is to represent the show's logo and the pointy glasses are worn by one of the characters and are very 60s so I thought they would be fitting.


I didn't get a picture of my 'tragedy' mask on my other thumb because it looked a little special, but I promise it was there! The show was really awesome and I had an amazing birthday!

Anyway, this post has gotten longer than I expected so I'll leave it there, but I'll be back to normal blogging soon!

Thanks for stopping by,

~Another-Year-Older Nail Art Novice~

Saturday, 29 June 2013

ABC Challenge: Y is for Yellows and YRNails

I can't quite believe that it's nearly the end of the ABC Challenge already! I know I joined at the half way mark but it still seems to have flown by so quickly! Luckily we're already planning our next challenge as a group, woohoo!

So this week is Y and like a lot of people I reached for the yellows-although I don't actually have any polishes that start with 'Y' to use! This is a couple of lovely Revlons-Electric (the darker-3 coats on its own) and Sunshine Sparkle (the paler-2 coats over a coat of Barry M-Matt White). I also added in a lovely water decal by YRNails to get another Y in there, and because it's been a while since I used them. I've only done so twice before-once fairly successfully and once disastrously! I was hoping that this time it would go well, and thankfully it did!


I chose these delicate little bird cage decals to go with my lovely shimmery yellow and I really love them! I also added some La Femme Beauty glitter to my other nails-sadly it doesn't have a name or even a number but it's a mix of small purple and even smaller black glitters with gold and turquoise hexes and it's really pretty-I think it looks fab over Electric (my new favourite yellow polish-it's so bright and has a touch of shimmer to it too!)
For such a relatively simple mani, I'm really enjoying this look. I also really can't believe we've only got one week left in this challenge-boo! If you want to join in our next one then I will let you know the nitty gritty next week in my Z post. The ladies involved are all really wonderful and I'm so looking forward to taking on another challenge with them all. As ever, don't forget to check out all their fabulous 'Y' manis in the Inlinkz below.

~Nail Art Novice~


Tuesday, 16 April 2013

Try Something Tuesday-Full Nail Water Decals: A Disasticure

~Before I begin I just want to wish Rara a very Happy Birthday, coz it's TODAY, Yay!~

PIC HEAVY POST

So the other night I went out to a comedy gig for Rara's birthday, and I wanted to co-ordinate my nails with what I was wearing-my beautiful black and white polkadot rockabilly style dress. I've done plain black and white spotted nails before and wanted something different so I chose some fun spotted full nail decals from YRNails which I thought would look pretty good. I watched their 'How To' video along with Lisa from Geordie Nailstutorial video (which is really helpful if you've never applied full water decals before!) and got all my equipment ready to go. 

I started by painting my nails (badly) with two coats of Revlon-Black Star which is a lovely black with a silvery shimmer running through it to give a base colour if I needed one.


Then I set about applying my water decals and...here's where it all went wrong. Now I'm definitely not blaming the decals for this, I've seen lots of people use them well and get great results, I think it was my atrocious technique that was to blame for the mess they ended up in. 
Firstly, let me show you how they were supposed to look, with a little help from the lovely Wendy from Wendy's Delights:

Find her superior review of these decals here

I'm a bit ashamed of how badly mine do not look like the ones above really. Any how, here goes:

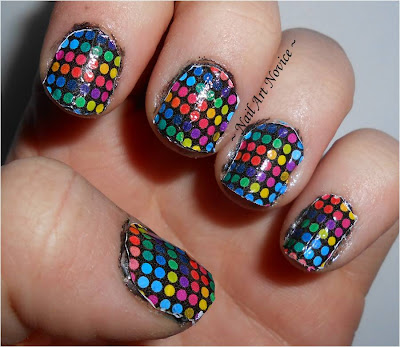
They don't look so bad from a distance do they?

Up close though you can see that I really did a terrible job!

And don't even get me started on my right hand!

I experienced SO many problems with these that I don't really know where to begin. I think my nails on my right hand were a little short (thanks to my Sheffield trip) because I struggled to get rid of the excess decal on my index and middle fingers simply due to how close to the ends of my fingers the nails are. Obviously I didn't cut them down as well as I could either, I didn't want to take too much of the widths so that I wouldn't end up with bald patches, but I should have been less cautious and they would have fitted my nails much better.

However even with the sizing difficulties I didn't manage to get these to stick to my nails at all. I followed all the directions to the letter, but they just sat on top of my nails and slid about no matter much I tried to get them to stay put by smoothing them into the corners. Even my right hand ring finger (which is probably the only one I cut to the correct size!) didn't stick down on its own, I ended up putting a layer of top coat underneath them all to hold them into place! I don't know what I was doing wrong. I also covered them in layers of topcoat, and they still lifted away from my nails.

As you can see only two of these are completely flush with
my nail! 

I ended up with lots of rough edges, lifting sections and creases and they just didn't look very nice. I went for a shower about an hour after putting these on and they all just lifted off so much that I just peeled them off in the end.

This happened just from picking up my towel! They all ended up
like this though =( =(

I'm really sad I wasn't able to make these work for me! I think they have the potential to look so amazing, and all the other blogs I've seen with people wearing them have been beautiful, I've never seen anyone else have this amount of problems. I am determined to try these again and get them to work, but maybe not for a while because I'm so disheartened by this first attempt =( I think next time I'll try them over naked nails to see if that helps, and obviously cut them down better.

In the end, because I was running out of time to get ready for the evening I ended up wearing something very simple (but lovely) over my Revlon base-two coats of Absolut Lacquer-Mrs Claus' Night Out. Although this is technically a Christmas polish, one of the reasons I bought it was because it had the potential to be used all year round, and I was right! These pictures were taken the day after so there's a bit of tip-wear but they're still in better condition than my decals were! I really like this combo =)


So there ends the sorry tale of my first attempt at full nail water decals. I hope you've at least enjoyed looking at my total failure, and if you have any hints or tips as to how I can make them work for me, please let me know in the comments!!

~Nail Art Novice~
Related Posts Plugin for WordPress, Blogger...