Showing posts with label Polkadotty. Show all posts

Tuesday, 14 October 2014

Mani Swap With The Imperfect 10

Hello loves! A couple of weeks ago Rachel from The Imperfect 10 blog tweeted me to ask if I wanted to a mani swap and of course I said yes! I really like doing things like this, it's always really interesting to see how people recreate something of yours and it's fun to do yourself as well.

After looking through her blog, I finally (after a lot of deliberation) chose this Black Magic mani from last year to be the one I would recreate:


I thought it looked really glamorous and smart and really liked the look of it. In my recreation I used gold instead of silver which still looks fab against the black. I used Maybelline-Winner Takes It All and Barry M-Black Multiglitter for some sparkle.


I also just noticed that I swapped the accent colours over, I hadn't realised I'd done that until now, haha! Still, I think it looks cool. Black and gold is a classic combo and I really like the line/dot combo-I hadn't thought to combine them before but it looks good I think.

Here they are side by side


and here's all four manis together!


Make sure you go and check out her post here and leave Rachel some love too-her blog is fab!

This was fun! I'd love to do more of these so if you're interested in doing a mani swap then send me a message or a tweet, or leave me a comment and I'll get back to you =)

~Nail Art Novice~


Friday, 4 July 2014

Guest Post-Belle Glamour

Hi there my lovelies! I am Catriona and I normally post over on my blog at BGPolish (www.bgpolish.com) and today I am doing a guest post here whilst Jenni is on holiday!

 I did this look out of a whim! And I didn't actually know what I was going to do with it until it was finished, but I thought I would keep it simple in order for everyone to be able to try it if they liked. I started off by doing my normal nail routine and using my Nail Envy. After this I used LA COLORS - Hottie (2 coats) to completely cover my nails in the bright coral nail polish. I then used my large dotting tool to do dots in Crabtree+Evelyn Tomato, Laval Ultra Yellow and Laval Silver Grey.


I like this look because it is so simple, and it was fast to achieve the look as well! I finished the look off with a good coat of Seche Vite.


Thank you for reading!

Sunday, 8 June 2014

31WNAC-11-Polka Dots

Hey lovelies! Hope you are all having a good weekend thus far!

I've got some simple polka dots today-when I was choosing the colours of these I just wanted something bright but not too flashy. I found it in Barry M-Kiwi which is an absolutely gorgeous summery green from their new line-bright and summery without making you reach for the sunglasses. The dots and accents I added with Barry m-Coconut which is just the right shade of off white to not be too harsh! They're not the straightest dots in the world cos I was tired when I was doing them, but I still like em =)

Squse the dry cuticles!

I really like this colour! It's a bit greener in real life but my camera didn't want to play apparently. I love a dotticure-they're such a simple way to make a plain mani more fun.

Short and sweet today! Get out there and enjoy the sunshine =)

~Nail Art Novice~

Sunday, 13 April 2014

31WNAC 4-Green

Hello lovelies!
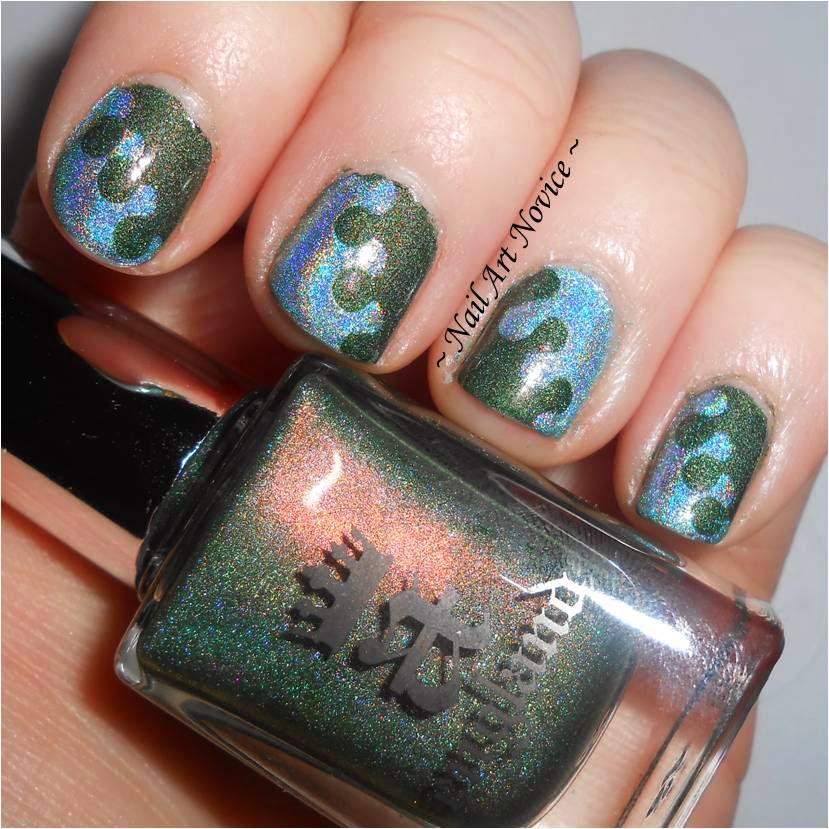
Sorry it's been so long since I last posted, I went away with my Gospel Choir last weekend and didn't manage to post beforehand! This is my green mani for my 31 Week Nail Art Challenge and I decided to do interlocking dots with a couple of holos. I got A England-Dragon in their anniversary sale at the start of the month (oops, had a little splurge!) and wanted another green to go with it. None of my green holos went that well (means I totally need more, right? =p) but in the end I went with Color Club-Angel Kiss so it would show up well. It looks really blue in these pictures but it's definitely green IRL!


I really like these, I love the way the colours play together and the two different holos work together. Dragon is just gorgeous too, that lovely red shimmer is a nice surprise! These looked amazing in the sun today in the park.

As a bonus, here's the nails I wore on tour-can you guess where we went? (These aren't the best nail art ever, they were done at about 1 am!)


I had a really brilliant time away and did lots of awesome singing! But I hope to post more regularly now I'm back lol.

Laters,

~Nail Art Novice~

Friday, 21 February 2014

Textured Dots

That's probably the most boring title I've ever written for a post! But it describes things pretty accurately to be fair. I fancied something bright and cheery and so I pulled out a new textured polish I picked up from Poundland the other day-Sally Hansen-Cherry Drop. This is a super bright polish so fitted the bill perfectly-I used two coats. Of course I couldn't just leave it plain so I added in some dots using Barry M-Matt White and I kinda like the way they look a bit worn on some of the nails, it's quite fun!


What's your opinion on the textured trend?

~Nail Art Novice~

Friday, 7 February 2014

Guest Post Week! Katie's Lost And Found

A Green skittle

Actually I really dislike Green skittles :p

Yea hi. I'll admit I had no idea where to start with this post. So I came and wandered around here looking for inspiration and eventually decided to use the lovely color theme here as a starting point. Seemed like a fun idea cos I never use green... until it occurred to me that, well, I never use Green and have no idea what to do with it!

 Anyway, after many changes of mind along the way we have this.


Polishes are Nails Inc-Battersea on ring. Nails Inc-Green Park for the darker green and Sinful Colors-Mint Apple for the paler Green. The bonus being I'd not yet got round to playing with any of these before, and I like them a lot.

Hope it turned out ok.

Katie, http://www.katieslostandfound.blogspot.co.uk

Sunday, 5 January 2014

Sparkle And Shine

Hello lovelies! Hope you're all doing well and enjoying the year so far. I had a brilliant time at my New Year's gathering, but it really took it's toll on my poor nails, they're the shortest they've been for a very long time at the moment! I've got no free edge left on most of my nails, it's making me really rather sad =(
So much so that I was feeling really uninspired for what I should do on them once I took off my fabulous rainbows so I made my boyfriend choose something for me! (#LazyBloggerSyndrome lol). He decided he wanted something sparkly and so this is what I ended up with: Revlon-Silver Screen, Avon-Fabulous and Barry M-Majesty from their autumn textures. I decided to keep it simple and do a mixed size dotticure with the Barry M on top of the other colours.

Apologies for the tipwear in these, it wasn't apparent in real life!


This was so sparkly and pretty! I wish I was better at doing these kind of dotticures, I think it looks a bit of a mess personally, but I know they can look amazing because I always admire the ones Emma from Emma's Little Corner does (like this one!), but I just can't get them too look that good! Siiigh.

Anyway, that's my first mani of 2014 done, woo! Onwards!

~Nail Art Novice~

Wednesday, 6 November 2013

Mish Mash Week 15-Holographic

Ooh I can't wait to see this week's entries, I love me some holo polishes, and I definitely don't own enough! They're so sparkly and gorgeous! I did acquire a new lovely scattered holo recently, and used it for the base of my mani. This is Tara's Talons-Ol' Blue Eyes and it's scrummy! For those of you who don't know Tara's Talons are a UK indie range (one of the first) full of hundreds of limited edition and one of a kind polishes and they're all pretty gorgeous! Seriously, don't click on that link if you value your bank balance, haha! This is two coats over a similar base colour (because holos tend to be on the sheer side) and then details/stamping with GOSH-Holographic Hero and MoYou London's Sailor-3 plate. Forgive me, I couldn't resist using them again because the patterns are gorgeous and they stamp so well!


Ooft, love this! Although I feel I should apologise-if you can see some weird 'shadows' on my right hand it's because I was lazy and just painted another layer of Ol' Blue Eyes on top when my first attempts went wrong rather than starting all over again =P

As a bonus, here's a shot of Ol' Blue Eyes on his gorgeous ownsome:


Oh holo polishes, you so pretty, I want to own all of you.

Don't forget to check out the other dazzling goodness in the inlinkz!

~Nail Art Novice~


Wednesday, 16 October 2013

Mish Mash Challenge Week 12-Flowers

I decided to stray a little out of my comfort zone this week and have another go at some freehand roses, which I've only done a couple of times before. I stuck to traditional rose colours and did them in red on nude.
Polishes used: Rimmel-Red Obsession, Barry M-Lychee, Collection 2000-Damson Jam and OPI-Don't Mess With OPI with a smidgeon of black mixed in to make the darker parts of the leaves.


They're not perfect but they're really not too bad I think! The camera is a bit harsh on them, they look much better IRL I think. This design feels a bit Cath Kidstony to me-I love it!

Don't forget to check out all the other Flowers manis in the inlinkz below =)

~Nail Art Novice~

Monday, 29 July 2013

Rara's Super Quick Summer Nails

Hello lovelies! Rara here again! I'm posting today because Novice is away visiting her friend and doesn't have any internet so you get me instead! I've got a couple of summery designs I did that were pretty quick and easy.

First up-Gradients and stars.

I wanted to try some gradients on my own this time [Novice-last time I did some for her-here]. Me and Novice went to the park in the sunshine and I took my polishes. I used Avon-Forget-Me-Not Blue, Plum Seduction and Make My Day with a Rimmel glittery top coat. 
It was quite difficult to start with as I couldn't get the colours to blend properly, and I'm not sure I managed to get it right on all of my nails. I decided I wanted the colours to alternate so I went from blue to red then red to blue. After that I added some nail stickers that are also from Avon. I was quite pleased with the results and got a few compliments from them too, which is always good!


Next up-a summery dotticure.
Polishes used were both Essie-Mojito Madness and Off The Shoulder. This was just a quick and simple mani-I needed to paint my nails but was just going to bed. I painted each layer in between reading chapters of my book. Super quick, very easy and quite effective!


That's all from me for today but I'm sure I'll see you again soon!

~Rara~

Thursday, 16 May 2013

Ask A British Blogger III + Nail Art!

This fortnight's British Blogger question is 'What is the oldest polish in your collection?' and to answer it instead of just taking a couple of pictures of what is frankly a rather boring bottle, I thought I'd do some nail art with it.
Introducing Avon's Fabulous which is about 10 years old I would guess. I can't find any information on it on the internet but I did get a lot of Avon stuff when I was 13/14 so I guess it's from then. It's actually the only Avon one I've got left as it survived the years much better than any of the others which turned into watery messes or hardened to the point where they were un-usable. It's quite a pretty colour though, so I am glad that I've still got it in my stash!


Check out how dated the bottle looks!

I couldn't decide what I wanted to do so I opted for a skittle using various techniques, and using Collection-Electric Dreams which looks awesome against the bronze. This is two coats of Fabulous and it was very nearly a one coater, which I was surprised at! It didn't have a horribly strong smell, but definitely more than newer polishes which I guess means it's not 3-free.

It's also a pain to try and hold comfortably too


The two colours together reminded me of Egyptian artifacts so on my thumb I did an Eygptian-inspired design (the Eye of Horus-Egyptian symbol of protection and good health) with my Barry M nail art pen in black.


I really like my thumbs and also my double dotted little fingers-I think they look quite nice without being too overwhelming. I love the colours together too.
So that's my oldest polish! What's yours?

~Nail Art Novice~

Check out everyone else's posts here:

Thursday, 9 May 2013

ABC Challenge: R is for Rainbows!

A few days after I received my first ever holo polish (and immediately fell in love) I got my second one in the post after purchasing it from the Nail Newbie's blog sale. (I ordered it in April before my polish ban, just so you know!) It was GOSH-Holographic Hero which is a limited edition silver holo polish. It shines with all the colours of the rainbow, so it was my immediate thought when it came to doing rainbows this week:

3 Coats-could have used two but smudged it!

But that was much too boring so I decided to add some nail art on top. On my fingers I've got a dotted rainbow ombre/gradient and then stripes on my thumbs because I loved them so much last time. I didn't want to cover up too much of the lovely holo, so I used striping tape between the colours. This way I've got rainbows on top of rainbows =)

Polishes used: Red-No 7-Siren, Orange-Barry M-Satsuma, Yellow-Rimmel I Heart Lasting Finish-Sunshine (I finally caved a few weeks ago and bought a decent yellow polish because the London Girl one was an amazing colour with an AWFUL formula!), Light Green-Cairuo-Green Tea 22, Dark Green-Rimmel I Heart Lasting Finish-Block Your Green, Light Blue-Sally Hansen Complete Salon Manicure-Himalayan Blue, Dark Blue-Maybelline Forever Strong Pro-Dark Denim, Purple-Maybelline Forever Strong Pro-Mellow Mauve. And Holographic Hero of course! The bottle says it's only good for 24 hours of wear, but I have topcoated the life out of it in the hope to prove them wrong-we'll see!


This is another mani I love, it's so colourful and cheerful and when the holo particles (if that's the right word!) catch the light it's amazingly sparkly too! I'm really hoping it at least lasts the weekend. Fingers crossed ey?

~Nail Art Novice~

Don't forget to check out the other ladies' 'R' entries:

Thursday, 21 March 2013

Suddenly I'm Bright And Breezy

Sadly my lovely fishtail (plaited!) mani suffered badly at the hands of my first Scuba Diving lesson last night, so it's time for a change again. Spring is still stubbornly refusing to appear in Britain at the moment (BOO) so I thought I'd wear the brightest mani I could in defiance of our grey skies and rainclouds. I recently picked up some of the Barry M gellies after seeing them on so many blogs and falling for them a little-I got Plum, Satsuma and Greenberry and would have got Lychee too had they had it in the shop! Sadly, no success this time.
This simple polka dot accents mani uses Satsuma and Greenberry which frankly look AMAZING together. I always knew I'd love Greenberry after seeing it on so many blogs and thinking it looked awesome every time, but I am also really enjoying the incredible brightness of Satsuma. Bright orange was the colour of my course society at university and I just so happened to be wearing my hoodie at the time I was painting my nails-it's a perfect match for Satsuma. I love happy coincidences.
Sadly I seem to have picked up the pot of Greenberry that everyone else had used for testing as it had a lot of dried polish around the outside edge of the bottle and so didn't close properly and wasn't as nice to apply as I had thought it would be-hoping a few drops of Seche Restore will sort that problem out though. Satsuma applied very nicely although dried fairly quickly when I was doing the dots leaving me with strings as you can see on my right thumb. Ah well.

Anyway, on to the pictures, featuring the return of my left hand now that my ring finger nail is an acceptable length again, this is three coats of each polish:


There's not much to say about this, I just fancied something excessively bright! I also have a bit of a thing for opposites and patterns so I like the symmetry of the design and the opposing colours, it makes me happy. Simple but effective!

~Nail Art Novice~

Title of post taken from 'Getting to Know You' from The King and I

Check out what some other awesome British Bloggers have got going on this week:


Friday, 15 March 2013

Ridiculousness for Red Nose Day

Today is Red Nose Day in Britain where people across the country "do something funny for money"-trying to raise as much as we can as a nation to help vulnerable people both in the UK and third world countries. It's one of the things that makes me proud to be British-every year we have two massive fundraisers, one in March (Comic/Sports Relief) and one in November (Children in Need) and no matter how much of a recession we're in we always raise millions to help those who aren't as lucky as we are. I haven't done anything interesting this year but I will be donating some money, even if I can't afford much.
Every year they sell red noses to help raise money too, which are always a bit silly and fun-this year's are dinosaurs! This inspired me to do some Red Nose Day nail art complete with some ridiculous extra features which I've always wanted to try out-this gives me the perfect excuse!

Polishes used: Rimmel Wear Maxx-Serene (gorgeous shimmery shiny white), Rimmel Wear Maxx-Celebrity Bash (a beautiful dark blood red-I'm a sucker for these! Both these polishes cost me just £1 each from Poundworld-bargain!), Rimmel I Heart Lasting Finish-Double Decker Red, Colour Me-Colour Me White and details with my L.A Colors Art Deco striper.

This is 3 coats of Serene, it's very sheer but also very very pretty-almost pearly.

Next I added spots using Celebrity Bash and painted my accents with Double Decker Red. I'm still not great at getting my dots perfectly spread out and sized equally but I guess it comes with practice. I added white eyes to my accents and black pupils and smiles. Then I added my ridiculous features to my thumbs and voila! This is what I was left with:


GOOGLY EYES!! =D


My red noses with one of this year's Di-NOSE-saurs

I'm not expecting the googly eyes to stay on very long as they're not secured with anything other than a blob of topcoat underneath/round the edges but I love the fact that they look completely absurd and wonderful. I can't help but love this silly mani, it's just awesome. 

Are you guys doing anything for Red Nose Day?

~Nail Art Novice~

Tuesday, 12 February 2013

Try Something Tuesdays-Going Dotty!

I want to introduce a regular feature to my blog, even though it's only just about a month old. I'm so new to this game that a lot of techniques and styles that seem to be common place to a lot of nail bloggers are still completely alien to me, and I want to get better, I want to get good at this. So I decided to utilise the expertise of my fellow bloggers and start Try Something Tuesdays. Every Tuesday (I hope) I'm going to find a tutorial for a new technique I haven't attempted yet, or a mani I want to attempt to recreate, or even something I want to do from somewhere inside of my own head and try it out, and then post the results. Some might work spectacularly, some might fail in a smeary blobby mess, but I'll keep persevering. I'll keep trying and trying again until I master everything that I want to master and evolve from a Novice into a proficient nail blogger. This is the hope, anyway.

I'm going to start this on my very first week with a polka dot manicure to match my gorgeous black and white rockabilly dress I might be wearing on Valentine's Day (which can be found here on Ebay as I don't have a picture in it yet)

I know this is (in theory) a spectacularly easy thing to master, but I think getting the right number and size of dots is going to be the tricky thing for me-I'm not very good at getting them consistent yet and my practises have ended up looking a little crazy. I'm going for a simple straight line pattern, rather than placing them randomly and hope it turns out a bit better.
I originally was just going to do black and white and keep it monochrome, but my black nail varnish isn't the greatest quality for dotting and I fancied a little splash of colour on my accent nails, which now looks a bit bonkers but I kinda like it.

Polishes used were: Number 17 Fast Finish in Nightshade, Colour Me in Colour Me White, Rimmel I Heart Lasting Finish in  Block Your Green, Marks and Spencer Nail Colour in Blue (that, can I add, is definitely more purple), Number 7 in Siren (red), and Barry M in Cobalt Blue (which is getting a lot of use at the moment, but I shall try to give it a rest soon). I painted my accents (thumb and ring finger) white, and the rest of my fingers black, then pulled out my dotting tools.
Here's the results:

What's annoying is that I did actually bother cleaning up today.
Clearly I forgot my little finger *shakes fist*


Actually, I quite like them. They do look a little bit mad if I'm honest, and are probably a bit Lichtensteiny rather than true polka dots but they're an improvement on my practises in that they're all roughly the same size and a lot more evenly spaced out. Next time I try this I'll probably opt for the next size up dotting tool and make fewer bigger dots, rather than more smaller ones, as I think it'll look a bit neater overall. For my first Try Something Tuesday though, I'm happy, plus I think they'll look awesome with my dress if I actually get to wear it!

~Nail Art Novice~


Related Posts Plugin for WordPress, Blogger...