Showing posts with label Black and White. Show all posts

Tuesday, 9 December 2014

OMG Nail Strips Review

~Items in this post were sent to me for my honest review~
~PIC HEAVY POST~
Hello lovelies,

No Glitter Me Monday nails this week because I was sent some awesome nail wraps from OMGNailStrips to review and finally managed to get them on my nails.

They have loads of different designs (which you can see here) and it took me ages to narrow it down to the two I wanted! I decided to choose something I wouldn't be able to easily recreate on my nails myself and so these were the ones I ended up with:

Geometric and Paisley strips
When you open up the package, this is what you get:


That's fourteen different sized nail strips that you should be able to match easily to all of your fingers widths. You can see the width of each strip at the bottom, and they're all about 3cms long-so big enough to cover most nails easily. There is a video on the OMG page that shows you how to apply the strips which I followed almost exactly. The only thing I did differently was that I used each strip for two nails where I could. My nails aren't especially long at the moment and it felt really wasteful to me to have a good 2cm extra on each strip that would just get discarded.
Once I had separated the strips from each other on one set and matched them to my nails, I turned them face down and, using the same size strip from the other set as a guide, drew around the curve on the flat end of the strip to make it double ended (I hope this makes sense, I forgot to get a photo!). Then I removed the plastic top sheet from the strip as normal, but before I removed it from the backing I cut the strip in half, and cut around my guide line so I had a curve to fit into my cuticle on each end of the strip. I applied each half strip to my nails as per the rest of the instructions.
In total I ended up using 6 out of 7 strips from one set for both hands, which means I definitely have enough to do a full mani again if I wanted to! If your nails are longer you can still get a full mani and some accent nails (with careful trimming) or even use them in some funky nail art like Charlie over at Pocket Money Polishes did with her strips.

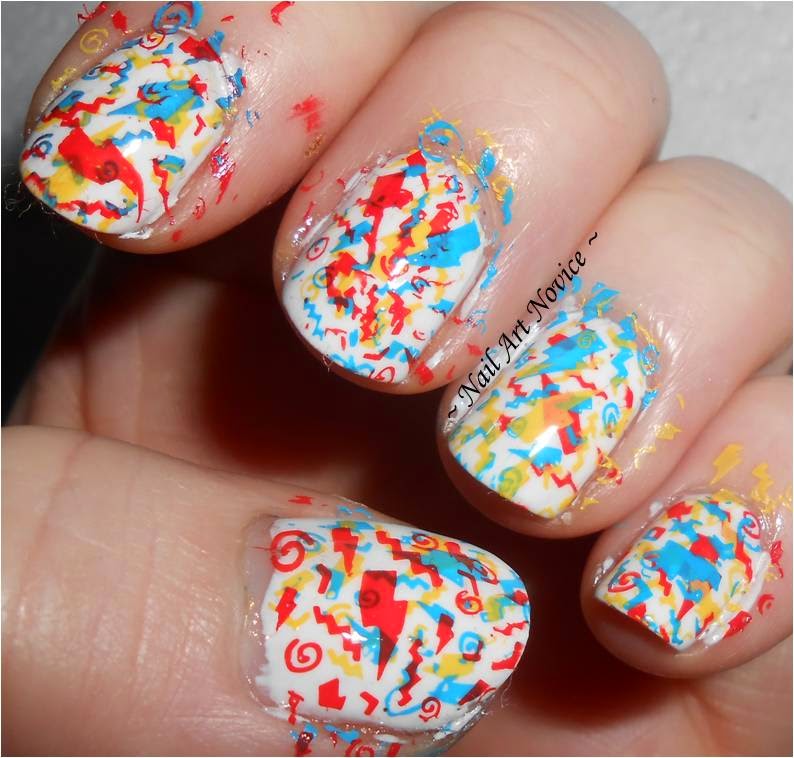
Here's what I ended up with:


This was straight after I had applied the strips-no topcoat or anything on top. I did find placement a little tricky on my non-dominant hand and had to take off and re-place several strips before I got them perfectly straight. This wasn't a problem though, because although the strips are sticky, they aren't too sticky so until you smooth them onto your nails you can lift them off and move them as needed. I used a rubber cuticle pusher to smooth them down and make sure they were well fitted in my cuticles and side walls and it worked really well.

The next stage of the process was to use a cotton bud dipped in remover (and squeezed dry) to lightly brush over the wraps to help them adhere to your nails better. I tested this with both my normal remover (containing acetone) and acetone free remover and it's definitely something you should only do with acetone free remover as my normal one started to remove some of the design. If you look closely at my ring finger in this picture you can see this at the left hand edge of it slightly.

Please don't judge me for the state of my Seche bottle!

I wasn't keen on the finish of these before I top coated, they felt slightly sticky, but after TC they feel just like normal polish which is good! I was worried that my Seche might shrink them but there seems to have been no issues, thankfully!

I really like these strips. They're definitely not as easy to apply as a plain or glittery mani, but they're really not too faffy-on a par with something like stamping I think. I like the fact you get lots in a pack so you can try them before deciding to do a full mani with them, or use them in different ways. I love the different designs-there's so much choice and there's definitely a lot of options that you couldn't recreate in nail art without taking a lot of time and effort! I'm not sure how long they will wear, I am a little dubious as to their 10 day claims as mine already have some slight tip wear after only a couple-although this could entirely be down to my application and not the strips. I think they're a really simple and fun way to get some funky designs on your nails-plus think how cool this one would look with some Sheer Tints-style colours over the top!

You can get OMG nail strips here and each set costs $7.99 (about £5!) and they ship internationally. I think at the moment you can get 5 sets for $25 (about £16) with the code 5PACK and 10 sets for $45 (about £29) with the code 10PACK at the checkout. You can also find them on Facebook, Twitter and Instagram.

Phew, what a lot of words! I hope you enjoyed my review though.

~Nail Art Novice~

Friday, 21 November 2014

A-Z Challenge: Dark

Hello lovelies!

Only a day late with these! I'm really struggling balancing work with my home life. I'm sure it's something I might get used to in time but for now I am just wiped out when I get in and doing anything is too hard!

For my 'Dark' nails I did a green and black gradient. It was originally going to be purple and black but somehow that idea changed to green and I can't complain too much haha!

Polishes used: Revlon-Black Star, Rimmel-Mermaid Green and Camouflage. All gorgeous shimmery colours!


I really like these, they're my colours! They feel a bit witchy to me.

I'll add all the inlinkz later when I get back from work (still not used to saying that) but I just wanted to get them up for now.

Happy Friday folks!

~Nail Art Novice~

Thursday, 13 November 2014

A-Z Challenge-Copy Cat

Hello lovelies!

I apologise for my absence this past week, life got  a bit hectic and I just didn't find the time to post! I also have big news, but I'll tell you more later on that subject.

This week's A2Z challenge prompt is 'Copy Cat' and I chose to copy the pattern from my graduation dress because it's a bit different and interesting:


I used the blobbicure method, and I have to give some credit to Starfish Nails for reminding me of this techniques existence with her bold mani last week. I started with a base of W7-Black which is currently the consistency of glue and is a pain to work with. I need a new black! Whilst my second coat was still wet, I blobbed on Barry M-Spring Green and Maybelline-Bare It All and then added black dots in the centres of some of the blobs with the W7.


These were really fun to do-watching the polish spread out over the nails was fun. I think I matched my dress pretty well too, which is what I wanted! As ever make sure you check out the hub page/inlinkz for all the other awesome designs.

OK so my big news is that I got my very first full time job, starting on Monday!!! I'm excited and terrified all at once, and I don't quite know what this means for my nails. Hopefully, as I won't be interacting with any customers face to face it won't be too restrictive, but for the next few weeks I might keep it low key just in case. *Sadly puts holo polishes away*. I will certainly try to keep up with the challenge, especially as the next two prompts are easy to make work appropriate, but I shall have to see how it goes. Wish me luck though!

~Nail Art Novice~

Thursday, 6 November 2014

A-Z Challenge-Bold

Hello lovelies!

Back with the A2Z challenge again this week and the prompt is bold. I love how these non-specific prompts are really open to interpretation so that everyone comes up with something different. Two things sprang to my mind for the word 'Bold'-black and white manis and really bright colours. As I did some pretty bright colours for last week's prompt I decided to go down the black and white route, but add a hint of bright colour to make it fun.

I started with a base of Barry M-Matt White and then triple-stamped on top of it using MoYou London-Back to the 80s 03 changing up the angle that I put the stamp on and generally playing around with them. For my stamping colours I used Sally Hansen-Brisk Blue and Lightening and Barry M-Satsuma.
This is how they looked at this stage (pre clean up) and I think it's a kinda cool effect!


I'm definitely going to have to do this again someday cos I like how it looks a bit mad and random.
Over the top of that I did some vertical stripes with striping tape and W7-Black.


What do you reckon? I think they're pretty bold and I love the flashes of colour underneath the stripes, plus they were really fun to do-not having to think about where you're placing your stamps is liberating!

That's all from me as I have to head out five minutes ago, but make sure you check out all the other Bold manis in the inlinkz and on the A2Z hubpage here.

~Nail Art Novice~

Tuesday, 9 September 2014

Glitter Me Mondays: Tara's Talons-The Mill Creek Killer

Hello loves,
Yet another week when I didn't manage to get this up on Monday but hey ho. I'm failing at blogging a bit at the moment because I keep getting distracted and doing things at the weekend and not getting posts scheduled-doh. I can't complain too much though, I had a great time this weekend cos my friend spontaneously decided to visit and take me to the seaside!

This week's GMM is another Tara's Talons because I love them and also because I have a lot of untried ones (I spoiled myself a little in her closing down sale!). This one's lovely-a black jelly base with blue and green glitters of various sizes in. It would layer well but I chose to wear it over a couple of coats of W7-Black to make life easier.


It's so sparkly! I love how it catches the light as I move.

Don't forget that Tara's Talons is RE-OPENING on the 21st September, and I should be able to give you a sneek peek at some of the polishes soon. Make sure you are following her on her Facebook page to get all the details, and tell your friends too as she's having a giveaway when she reaches a certain amount of followers!

As for me? I'm just going to try and get my blog posts back on track, so hopefully next week this will actually be posted on MONDAY, haha! We shall see...

~Nail Art Novice~

Thursday, 29 May 2014

Twinsie Nails-Roses

It's Twinsie time once again here on my blog and this month I have two twinnies because there was an odd number of participants taking part. I was paired with the lovely Lothwen from Manis and Makeovers and the fabulous Hannah from The Dalai Lama's Nails and we were given the prompt Roses (this month's theme is flowers). We were discussing our ideas and decided we didn't want to do the traditional vintage style roses and that we'd try something a bit funkier-and eventually came up with the idea of doing our roses in black, white and a splash of colour, but do our own thing within those parameters. I'm looking forward to seeing what the other ladies came up with!

I used Barry M-Matt White, W7-Black, Topshop-Cloud and Barry M-SLE2013 B for my splash of colour (such a catchy name that one!) and did vintage style roses in a very different colour scheme!


I really like em! OK they don't look hugely like roses in the pictures but they do in real life, and I love the colour scheme-feels almost classy somehow, but with that bright green to liven it up. I'm really intrigued to see what my twins have come up with too-once their posts are up I will link to them here-make sure you go and see theirs too!

The Dalai Lama's Roses

Manis and Makeovers' Roses

You can get involved with the Twin Nails group on Facebook here but get in quick if you want to join in for June (the theme is Candy) as the pairings will be chosen soon. It's a really good way to meet more nail bloggers and it's pretty fun! I will sadly be missing the next couple as I will be in Australia (eee!) so get in there and take my place aspiring nail artists ;)

Don't forget to check out all the other twin posts in the inlinkz below =)

~Nail Art Novice~

Wednesday, 7 May 2014

31 Week Nail Art Challenge 7-Black and White

I really feel like I should change the title of these the the '31-ish Week Nail Art Challenge' cos I just do them as and when I feel like it, haha!

Today's prompt is Black and White and I wanted to do something simple and classy. Inspired by my latest Polish Party mani (which was inspired by someone else!) I chose to do stripes in a mixture of sizes-although this time I kept the stripes the same way around on each nail, cos I thought it would look better.

Polishes used (nice and easy today!): Barry M-Matt White and W7-Black.


So there we go! My lines aren't all perfectly crisp but I still kinda like it! It does feel quite a grown up mani, I think it's the lack of in your face colours. Still it's nice to have a palette cleanser every once in a while, ey!

What do you reckon, do you like black and white manis or are you a neon and glitter gal at heart?

~Nail Art Novice~

Tuesday, 28 January 2014

Space Dust And Stamping

I've got a sparkly sparkly mani for you today! Before Xmas I picked up one of the new Rimmel Space Dust polishes-Total Eclipse. It's a gorgeous black polish with duochromey flakes in-they shift from fuchsia to green in the bottle and it's just a lovely effect. The Space Dust polishes are technically textured ones, but I found that there wasn't really much texture to this one once it was applied. More than a creme, yes, but less than some of the other textured polishes I have tried.

This is three coats of Total Eclipse on it's own, isn't it pretty!


I decided that, pretty as it was, I was going to add some stamping to it. I used Color Club-Over The Moon and MoYou London-Back To The 80s 2 for a cool space age/time travelly sort of effect. My camera really didn't like this combo, it was a bit dazzled! I also added a layer of topcoat to smooth everything out.

Sorry this is a bit pic heavy, I was trying to get good ones:


As I said, my camera was pretty dazzled but I think you can still see how cool this looked...right? I've been playing with the holo sparkles in the light a lot =D

~Nail Art Novice~

Don't forget to enter my giveaway!! Closes in three days!

Sunday, 27 October 2013

British Nail Bloggers Halloween Challenge


The British Nail Bloggers are having a mini, no pressure, Halloween Nail Art Challenge, and I thought I'd get in on today's prompt which is 'What's lurking in the dark?' with some simple nail art inspired by My Little Canvas. I used two coats of W7-Black for the base and then added white eyes with Barry M-Matt White. On top of the white I added a coat of Astral Lights glow in the dark polish (it's about 10 years old!) and then 'irises' in Barry M-Mango, Key Lime, Rimmel-Rose Libertine and Revlon-Electric. Once these were dry I added pupils with my black Barry M nail art pen.


Haha, these are utterly ridiculous but I'm really enjoying them! Check out the other cool designs in the inlinkz too!

~Nail Art Novice~

Tuesday, 16 July 2013

OMD! Challenge Day 16-Half Moons


Yesterday I was having a bit of a crappy day so I decided to shut myself away with a film that always makes me happy (WALL-E-I just adore that little robot with the enormous heart!) and do my nails because I always find that helps me stress bust. I chose to do half moons instead of ruffians because I wanted something that would take me a while to do and that I had to concentrate on. I was going to do all owls again, but decided to do a mix of 'night time' creatures instead. I've got a badger, a cat, a fox and an owl, with a cheeky half moon (see what I did there) on my little fingers.
Polishes used: Barry M-Black, Matt White, Lychee, Mango, Mushroom, Rimmel-Midnight Blue, Rose Libertine, Collection-Look At Me! and London Girl-# 70 plus the Barry M nail art pens in Black,White and Silver.
I really need to get myself some of those ring binder re-enforcer sticker things, as I had to freehand on all these half moons and they're all a bit wibbly as a result!


I'm not too sure about the cat's whiskers but it didn't look right without them. Otherwise I really love these nails-they're super fun and more importantly made me feel MUCH better once they were finished-Phew! I'm rather getting into this new mani every couple of days business, oops! Haha.

~Nail Art Novice~

Thursday, 4 July 2013

OMD! Challenge Day 4-Black and White

Today I've got another Oh Mon Dieu challenge mani for you. For more details/to take part go here.


Today is Day 4-Black and White. I don't think I've ever worn a full black and white mani before, so I found this one kinda fun. I used only two polishes-Barry M-Matt White and Black which also has to be some kind of record-I always use loads, haha!
I painted my left hand white and my right hand black and then did the same pattern on each but with reverse colors-striping tape accents and fan brush patterns.


I really enjoyed the opposite effect because they looked really cool next to each other. This will definitely be something I will do again, with different colours because it didn't take me long to do but I really like the end result!

~Nail Art Novice~

Friday, 21 June 2013

P P P P Pick Up A...

Hi all,
Just a quick post before I leave for Sheffield (my second home!) for a couple of days. Obviously this was supposed to be part of the ABC challenge but I've had an awesome idea for X which will take me AGES to do if I manage it, so I'm dedicating Sunday to that. In the interim I've thrown this one together really quickly with some bright colours and penguin accent nails-penguins are my favourite animal, they're just TOO CUTE.

All polishes are Barry M (surprise surprise!)-Black, Matt White, Mango, Passion Fruit, Guava and Key Lime plus their fabulous nail art pens in Black and White. I also added a little bit of sparkle with China Glaze-Fairy Dust.


Haha, I love these little guys, they're so adorable!

Hope you like them too. I'll be back late tomorrow (Saturday) night, tata!

~Nail Art Novice~

Tuesday, 16 April 2013

Try Something Tuesday-Full Nail Water Decals: A Disasticure

~Before I begin I just want to wish Rara a very Happy Birthday, coz it's TODAY, Yay!~

PIC HEAVY POST

So the other night I went out to a comedy gig for Rara's birthday, and I wanted to co-ordinate my nails with what I was wearing-my beautiful black and white polkadot rockabilly style dress. I've done plain black and white spotted nails before and wanted something different so I chose some fun spotted full nail decals from YRNails which I thought would look pretty good. I watched their 'How To' video along with Lisa from Geordie Nailstutorial video (which is really helpful if you've never applied full water decals before!) and got all my equipment ready to go. 

I started by painting my nails (badly) with two coats of Revlon-Black Star which is a lovely black with a silvery shimmer running through it to give a base colour if I needed one.


Then I set about applying my water decals and...here's where it all went wrong. Now I'm definitely not blaming the decals for this, I've seen lots of people use them well and get great results, I think it was my atrocious technique that was to blame for the mess they ended up in. 
Firstly, let me show you how they were supposed to look, with a little help from the lovely Wendy from Wendy's Delights:

Find her superior review of these decals here

I'm a bit ashamed of how badly mine do not look like the ones above really. Any how, here goes:

They don't look so bad from a distance do they?

Up close though you can see that I really did a terrible job!

And don't even get me started on my right hand!

I experienced SO many problems with these that I don't really know where to begin. I think my nails on my right hand were a little short (thanks to my Sheffield trip) because I struggled to get rid of the excess decal on my index and middle fingers simply due to how close to the ends of my fingers the nails are. Obviously I didn't cut them down as well as I could either, I didn't want to take too much of the widths so that I wouldn't end up with bald patches, but I should have been less cautious and they would have fitted my nails much better.

However even with the sizing difficulties I didn't manage to get these to stick to my nails at all. I followed all the directions to the letter, but they just sat on top of my nails and slid about no matter much I tried to get them to stay put by smoothing them into the corners. Even my right hand ring finger (which is probably the only one I cut to the correct size!) didn't stick down on its own, I ended up putting a layer of top coat underneath them all to hold them into place! I don't know what I was doing wrong. I also covered them in layers of topcoat, and they still lifted away from my nails.

As you can see only two of these are completely flush with
my nail! 

I ended up with lots of rough edges, lifting sections and creases and they just didn't look very nice. I went for a shower about an hour after putting these on and they all just lifted off so much that I just peeled them off in the end.

This happened just from picking up my towel! They all ended up
like this though =( =(

I'm really sad I wasn't able to make these work for me! I think they have the potential to look so amazing, and all the other blogs I've seen with people wearing them have been beautiful, I've never seen anyone else have this amount of problems. I am determined to try these again and get them to work, but maybe not for a while because I'm so disheartened by this first attempt =( I think next time I'll try them over naked nails to see if that helps, and obviously cut them down better.

In the end, because I was running out of time to get ready for the evening I ended up wearing something very simple (but lovely) over my Revlon base-two coats of Absolut Lacquer-Mrs Claus' Night Out. Although this is technically a Christmas polish, one of the reasons I bought it was because it had the potential to be used all year round, and I was right! These pictures were taken the day after so there's a bit of tip-wear but they're still in better condition than my decals were! I really like this combo =)


So there ends the sorry tale of my first attempt at full nail water decals. I hope you've at least enjoyed looking at my total failure, and if you have any hints or tips as to how I can make them work for me, please let me know in the comments!!

~Nail Art Novice~

Monday, 15 April 2013

Birthday Bunnies!

Hello lovelies, Rara here again!
It's my birthday this week =D so for the past month and a half (probably longer actually) I scoured the internet for a new dress to go out in. [Novice-She did-I kept getting hundreds of FB messages with just links to pretty dresses in, and all the ones I liked were the wrong ones!] I found loads of beautiful dresses but not one that made me go 'WOW, I NEED THAT ONE IN MY LIFE!!!'
I tend to buy the vast majority of my clothes from Dorothy Perkins so I was determine not to get a dress from there this time. Last weekend I went into town and dragged my sister into every shop that sold (reasonably priced) dresses and found none =( In the end I gave in and went into DPs and lo and behold there was MY DRESS!!! I should have just gone in there earlier and saved all the bother. It was even reduced from £45-£25 so it was even better!
Inspired by my new beautiful dress I did a mani to match!


My dress design

It was really simple, I only used three polishes including the top coat but I love it and loads of people have commented on it at work and around and about-even the old men collecting their pensions! (I work in a post office.)
The black I used was Sinful Colors-Black on Black which was only £1.99 in Boots (yay!) and Barry M-Matt White plus Barry M-Basecoat and Topcoat. The rabbits were done with a dotting tool.


I LOVE this mani, especially as it matched my birthday dress perfectly and all night I kept placing my hands against my dress to admire the effect.

Hope you like it as much as I do!

Until next time, 


Rara x


~

Aww, I love these bunnies! They did go perfectly with her dress too. I think my favourite is the tiny cute bunny on her index finger, he's got a little stubby nose and everything. Also enjoying the bunny-who-ate-all-the-carrots on her ring finger! And because she's truly dedicated, she even did matching toes too, even though they weren't going to be on show.
I'm always impressed with Rara's nail art, she's a natural! Can't wait to see what she comes up with next!

~Nail Art Novice~
Related Posts Plugin for WordPress, Blogger...