~Before I begin I just want to wish Rara a very Happy Birthday, coz it's TODAY, Yay!~
PIC HEAVY POST
So the other night I went out to a comedy gig for Rara's birthday, and I wanted to co-ordinate my nails with what I was wearing-my beautiful black and white polkadot rockabilly style dress. I've done plain black and white spotted nails before and wanted something different so I chose some fun
spotted full nail decals from
YRNails which I thought would look pretty good. I watched their '
How To' video along with Lisa from
Geordie Nails'
tutorial video (which is really helpful if you've never applied full water decals before!) and got all my equipment ready to go.
I started by painting my nails (badly) with two coats of Revlon-Black Star which is a lovely black with a silvery shimmer running through it to give a base colour if I needed one.
Then I set about applying my water decals and...here's where it all went wrong. Now I'm definitely not blaming the decals for this, I've seen lots of people use them well and get great results, I think it was my atrocious technique that was to blame for the mess they ended up in.
Firstly, let me show you how they were
supposed to look, with a little help from the lovely Wendy from
Wendy's Delights:
.JPG) |
| Find her superior review of these decals here |
I'm a bit ashamed of how badly mine do not look like the ones above really. Any how, here goes:
 |
| They don't look so bad from a distance do they? |
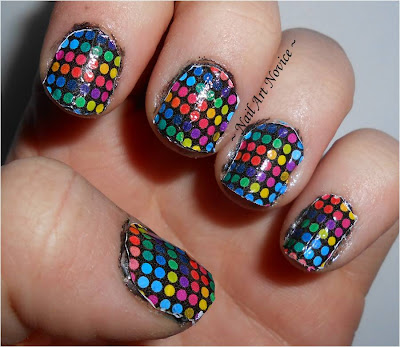 |
| Up close though you can see that I really did a terrible job! |
 |
| And don't even get me started on my right hand! |
I experienced SO many problems with these that I don't really know where to begin. I think my nails on my right hand were a little short (thanks to my Sheffield trip) because I struggled to get rid of the excess decal on my index and middle fingers simply due to how close to the ends of my fingers the nails are. Obviously I didn't cut them down as well as I could either, I didn't want to take too much of the widths so that I wouldn't end up with bald patches, but I should have been less cautious and they would have fitted my nails much better.
However even with the sizing difficulties I didn't manage to get these to stick to my nails
at all. I followed all the directions to the letter, but they just sat on top of my nails and slid about no matter much I tried to get them to stay put by smoothing them into the corners. Even my right hand ring finger (which is probably the only one I cut to the correct size!) didn't stick down on its own, I ended up putting a layer of top coat underneath them all to hold them into place! I don't know what I was doing wrong. I also covered them in
layers of topcoat, and they still lifted away from my nails.
 |
As you can see only two of these are completely flush with
my nail! |
I ended up with lots of rough edges, lifting sections and creases and they just didn't look very nice. I went for a shower about an hour after putting these on and they all just lifted off so much that I just peeled them off in the end.
 |
This happened just from picking up my towel! They all ended up
like this though =( =( |
I'm really sad I wasn't able to make these work for me! I think they have the potential to look so amazing, and all the other blogs I've seen with people wearing them have been beautiful, I've never seen anyone else have this amount of problems. I am determined to try these again and get them to work, but maybe not for a while because I'm so disheartened by this first attempt =( I think next time I'll try them over naked nails to see if that helps, and obviously cut them down better.
In the end, because I was running out of time to get ready for the evening I ended up wearing something very simple (but lovely) over my Revlon base-two coats of
Absolut Lacquer-Mrs Claus' Night Out. Although this is technically a Christmas polish, one of the reasons I bought it was because it had the potential to be used all year round, and I was right! These pictures were taken the day after so there's a bit of tip-wear but they're still in better condition than my decals were! I really like this combo =)
So there ends the sorry tale of my first attempt at full nail water decals. I hope you've at least enjoyed looking at my total failure, and if you have any hints or tips as to how I can make them work for me, please let me know in the comments!!
~Nail Art Novice~


