Showing posts with label Greys. Show all posts

Thursday, 21 November 2013

Double Challenge Thursday!

Yes, today I've doubled up on my challenges-this mani represents Mish Mash Week 17-Grey AND November Tri-Polish mani number 2-see this post for more explanation about that! This was the mani that inspired me to do the Tri-Polish challenge-I'd already planned to do this in my head even before I saw the colour prompts. For this mani I've used my purple (Barry M-Prickly Pear) and my grey (L'Oreal Color Riche-Metropolitan)...and some other colours too. I know this means I'm completely breaking the rules of the Tri-Polish challenge but hopefully no-one will mind too much. Everyone has to break the rules now and again, right? Haha! Other polishes used were Revlon-Electric, Barry M-Mango and Rimmel-Rose Libertine plus the Barry M nail art pens.

I'd wanted to do this mani since I first got this grey polish since it's the perfect colour but couldn't figure out quite how. Thankfully Rara did a similar mani in summer which gave me all the inspiration I needed!


I also did a very silly photo when I was cooking dinner last night, but I couldn't resist-teehee


Haha, I love my little micies! Hopefully you guys do too =)

~Nail Art Novice~

Wednesday, 29 May 2013

ABC Challenge: U is for Upcycled Umbrellas

I decided at the end of the weekend that I wanted to do something more fun with my grey gradients so I decided to incorporate them into this challenge and 'up-cycle' them. They were the perfect colours for a rainy theme, so I went with umbrellas and raindrops.

Polishes used:
Backgrounds: (as before) - Revlon-Hazy (Lightest grey), Topshop-Cloud (mid grey), Rimmel-Stormy Skies (darkest grey) and OPI-I Juggle...Men
Umbrellas: Barry M nail art pen in Black, George-Under The Sea (to get another 'U' in there), Revlon-Blue Lagoon, Rimmel-Pear Drop
Cloud (ring finger): A mix of Revlon-Hazy and Topshop-Cloud 
Puddle/Raindrops: A mix of Revlon-Blue Lagoon, Sally Hansen-Himalayan Blue, Rimmel-Aqua Cool and Barry M-Neptune Sea


Posing with my umbrella, as you do

I enjoyed doing these, they were all just sort of freehanded on. To make the water I just put a small amount of each colour on a paintbrush and painted to see what came out of it. I quite like the fact that there's a real mix of colours in there, and each raindrop is slightly different to its neighbours. Unfortunately this mani didn't last long, because my grey-dients were already in a state when I put this on, so I probably took it all off about 12 hours later. It was fun while it lasted though!

~Nail Art Novice~

Check out the other awesome 'U' manicures:

Thursday, 23 May 2013

A Grey-dient and a Plea

Hello lovelies!
I was going to do some awesome 'T' themed nail art for this week's ABC challenge but then I realised I needed work appropriate nails for this weekend as I'm working for my friend's company (Yay for the work, boo for the nails!)
I had no intention of doing gradients originally but Rara wanted me to do some on her when she came to visit (with her broken arm) so I decided to practice on myself first and I'm actually really glad I did!

Polishes used: Revlon-Hazy (Lightest grey), Topshop-Cloud (mid grey) and Rimmel-Stormy Skies (darkest grey). To make them slightly more interesting without making them inappropriate for work I added the subtlest of sparkles with OPI-I Juggle...Men which flashes blue and purple in the light but is otherwise fairly un-noticeable.


I really like the way this has turned out. I don't know why I've not attempted a gradient before but I shall be trying them again because they're actually really pretty in a subtle, less in your face way than most nail art. I didn't actually end up doing them on Rara, but there's always next week for that!
I will hopefully still get my 'T' nails done on Monday too-keep an eye out!


I said in the title of this post that it contained a plea so here it is:
Me and Rara have entered a competition to win a holiday to Dublin and we've made it to the final 5! Now it's all down to Facebook votes and we really need your help! If you could take a couple of seconds to go to this link and vote for 'Jenni and Sarah' I would be so so grateful! And of course, if we won, we'd both sport appropriate Irish-themed nails!
Thank you so much!
~Nail Art Novice~

Wednesday, 22 May 2013

L'Oreal Color Riche Collection-604 Metropolitan

I had completely forgotten I hadn't uploaded my final two swatches of my Color Riche polishes, so apologies! These last two are definitely my favourites of the ones I got from Fragrance Direct.

Today's swatch is number 604-Metropolitan which is a lovely grey creme.
This is three coats with no top coat-you can see that it's really lovely and glossy. I could have easily only used two coats for the same effect. The thumb and ring finger show stripes done with all four colours that I purchased-607-Rue Montmartre608-Luxembourg Garden604-Metropolitan and 502-Purple Disturbia. I think the bubbles on these were caused by my application technique as opposed to the polishes themselves.


Natural Light in this photograph


Unlike the other two polishes I've swatched thus far, there is no ambiguity about colour with Metropolitan-it's a lovely shade of grey-not too dark or too pale. Application was lovely because it has the same long, flat brushes that the other Color Riche polishes have (see this post for a picture) which allow you to cover the nail in two strokes. I didn't need to do any clean up following applying this polish for these pictures, which I was particularly impressed at as I hate cleaning up!

I got these from Fragrance Direct priced £1.20 (they have about 15 shades currently) but they are also available (in limited shades) at Boots and Superdrug for £4.99. Bearing in mind they only have 5mls of polish in I think that's a little pricey! A word of warning though, if you do order some from FD then search for swatches first because the colours on their website are very misleading!

I've got one more swatch to come, and keep an eye out, it's a gorgeous colour-my favourite of the bunch!

~Nail Art Novice~

Wednesday, 3 April 2013

Bonus Post!

Just a quick one for you-I managed to squeeze in this quick fishtail mani (I still love them) in the small amount of time I had at home yesterday. This was attempt two, the first one wouldn't work because two of the colours were too sheer, so they will have to come out another day. Also, Sheffield has been hard on my nails, I've lost both thumbs plus my left index and middle fingers so I have teeny nubbins again at the moment!

Polishes: Rimmel Lycra Pro-Aqua Cool (Not a clue why this lovely shade of periwinkle is called 'Aqua' but there you go), Revlon Top Speed-Hazy and Barry M-Greenberry

Oh and I cleaned up. I cleaned up FOR HOURS. I spent longer cleaning up than I did doing the actual mani, and in the end I got cross and left it like this. I hate cleaning up, it's the worst. Just so that's out there.


OK, that's all for now, I've got another mani from Rara coming up soon and I'll (hopefully) be back at the weekend.

~Nail Art Novice~

Saturday, 23 March 2013

Fishnets and Fog

This was an idea I came up with a while ago, around the time I bought my magnetic polishes, but never ended up doing it. I had originally planned to alternate the colours on each finger but decided on something different in the end, because I wanted to see if the magnetic polish worked layered over another colour-which it does, hurrah. I also had more success with it this time than last time and managed to get decent patterns on 8 out of 10 nails this time around.

This is two coats of Rimmel's Stormy Skies which is a beautiful blue-grey polish and two coats of Barry M's Neptune Sea (using the fishnet magnet) as diagonal tips. I was going to tape it off but decided in the end that I couldn't be bothered so these were freehanded-think I wasn't really paying attention on my middle finger, oops!


Here's a shot before I added the Neptune Sea too. I really like this grey, plus it applied like a dream. Probably could have got away with one coat but used two to fill in bits I'd missed first time around:


As a bonus, I also wanted to show you this gorgeous L'Oreal polish I picked up in Boots the other day as it was on sale for £2.50 because I really like it!
Magic Croisette is a royal blue polish with a aqua/greeny/goldy shimmer to it and it's lovely! It's only a mini but not bad for that price, I reckon. It's currently on my toes because I wanted to use it straight away, and I did try to get a picture but they all look a bit weird due to my dodgy toenails-they're all tiny! So I'll upload one if you really want to see it, otherwise you'll have to wait til I use it or look at some swatches here.
Here's a bottle shot which doesn't really do it any justice at all:


Hope you're all having wonderful weekends!

Edit 24/3: I think I fall for Neptune Sea a little more every time I wear it-the blue shimmers in it practically glow in the sunlight and it does look really really lovely!

~Nail Art Novice~

Tuesday, 19 February 2013

Try Something Tuesdays-Striping Tape

It's time for another Try Something Tuesday post, hasn't time flown since the last one?
This week I'm trying out another really easy technique-using striping tape to create patterns on my nails.
I started with a base of Sally Hansen Insta Dry Brisk Blue which is a frankly AMAZING bright bright blue colour on its own. I had originally planned to team it with Sally Hansen Hard as Nails Xtreme Wear Going Green (from this post) but once I saw it on my nails I realised that the two together would be a bit too clashing and wouldn't really work very well, so I stuck to the one colour in the end.

This is two coats.

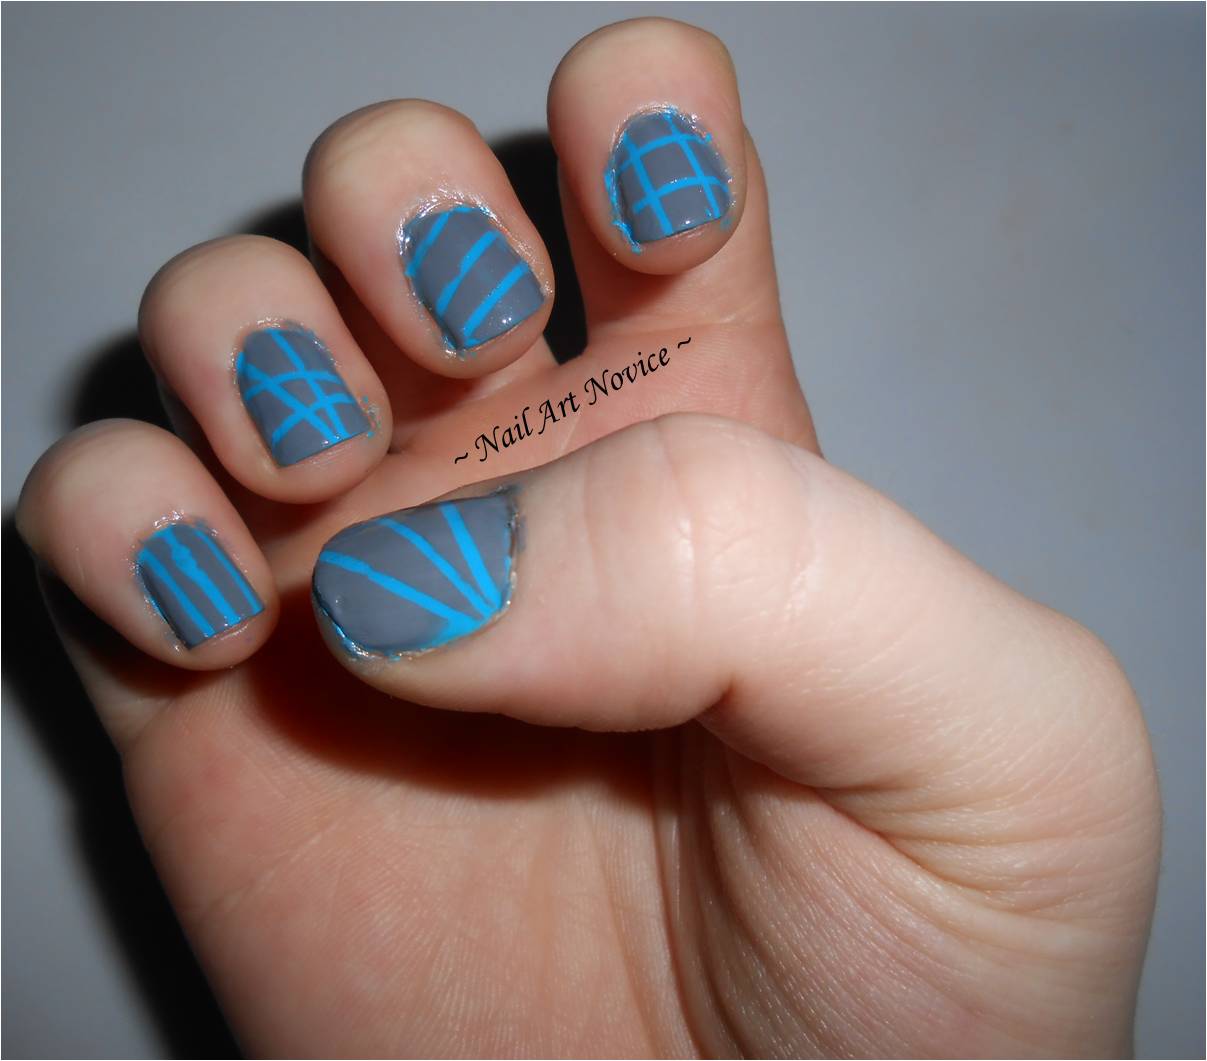
It's such a fantastically bright colour-dazzingly blue, it's amazing! The brush was really wide too-I managed to cover most of my nails with one swipe up the middle which doesn't happen very often. Dried pretty quickly too, as its name would suggest. Then I added my striping tape one nail at a time and covered it with a layer of Topshop's Cloud, a creamy grey polish. The first nail I did lifted off all the blue as well, so I went back and topped them all with a coat of Seche Vite and allowed it to dry before trying again. This was much more successful, although I still ended up getting better with practice-hence why you're getting pictures of my right hand today, it's a little neater than my left. It also has slightly longer nails due to cheese slicer related incidents.


Above two pictures taken with flash

Natural Light

I did a different pattern on each of my nails just to try them all out and see which ones I liked.I think I prefer the abstract one on my ring finger and the vertical lines on my little finger the most. It's weird just how much the grey has dulled the amazingness of the blue underneath, it almost looks more turquoise than bright blue now. They're not perfect, but I do think they look quite cool in bright light, in duller lighting they just look kinda tealy/grey and you can't really see the patterns. I almost decided to change my top colour for my right hand, but thought this would probably look even more peculiar so I stuck with the grey and overall it's turned out OK. I wish I had a paler grey though, it might have looked a little better.
Still the technique is pretty easy and not too time consuming for an effect which looks quite striking-I'll definitely be doing this again with different colours.

~Nail Art Novice~


Related Posts Plugin for WordPress, Blogger...