Sunday, 10 February 2013

Introducing...Rara!

I'm really excited to tell you all that my friend of the awesome ladybird nails post has decided to contribute to my blog from time to time as she doesn't want to start one of her own but still wants to share her designs. Like me, she's fairly new to this whole nail art thing, but she's already braver than me at trying new and interesting things. Rara (as she will be known on this blog) has known me my entire life and we've basically grown up giggling together, so I'm really pleased that she wants to help me out with this project. I'm hoping to get her writing her own posts soon, but for now I'll use her pictures to show you what she's been up to.

So with no further ado, I give you Rara's Water Marbling (her first time trying it,  and my first post about it!):

Polishes used: Avon Plum Seduction, Avon Starry Sky, Barry M Cobalt Blue as well as a Barry M topcoat.

The whole reason she wanted to try Water Marbling was because she found this blog post  by Chloe's Nails showing a step by step photo tutorial of how to successfully water marble, and she decided to have a go. Also, because she's just treated herself to the entire MUA Constellation collection she also did a caviar bead accent nail in the Leo colours. These are designed to have easy applicable bottles, and do look pretty fancy when applied! (Another good thing about these posts from Rara-she does things I don't. I'm not really a fan of textured nail art/polishes on myself, but she likes them, and this way you'll get more variety!)

Here's the results:


Not bad for a first timer, ey! Obviously they aren't perfect as there's a few holes and there are thin patches which aren't opaque but I've definitely seen worse first attempts at such a complicated technique. I'm really impressed with her thumb-the way the silver outlines the purple as if it was drawn on is awesome! And those beads on her accent nail look really pretty too. I know she's really pleased with the mani overall though, as am I, it's a really cool look and definitely on my to do list for when I'm feeling brave.


UPDATE
Between me writing/scheduling this post on Saturday night and it going live on Sunday night, Rara has done another water marble mani with better results, keeping the same beads on her accent nails. This time she substituted the Barry M with another Avon colour-Berry Shimmer, which seems to have worked better with this techinque:


As you can see, there are a lot fewer gaps around the edges of her nails, and (apart from the little finger) she has a lot better patterning across them all. The beads have lasted through washing up, which is pretty impressive considering they're only stuck on with a thin layer of polish and topcoat. You can pick the MUA beads up in Superdrugs (UK) for about £3 each.
Overall, I'm impressed!


~Rara & Nail Art Novice~

Saturday, 9 February 2013

Then There's Audrey, Lovely Audrey

Recently, I've acquired rather a lot of polishes and am determined to use them all eventually. Here's two of them-the beautiful 'For Audrey' from China Glaze and the very pretty 'Neptune Sea', one of Barry M's magnetic polishes. I've got two from their magnetic range, and I'm pretty sure (looking at those pictures) that I have managed to get the wrong magnets with both of them but oh well. I like the ones I have better really, so I'm not complaining. I clearly haven't quite got the hang of these yet, in all my practises on some old plastic packaging the patterns came up really nicely but I haven't had as much luck on my nails sadly. Neptune Sea is mostly quite a dark gun metal silver but it has loads of tiny bright blue glittery flecks in it, which makes it really shimmery and pretty.
I've also wanted For Audrey ever since I first saw it-I didn't have any light/sky blues in my collection anyway  and this was gorgeous-slightly on the teal side of blue, more ocean coloured than sky. It was just as lovely when it arrived, thankfully, it's definitely competing for my favourite polish.

This was 3 coats of For Audrey and countless of Neptune Sea (with the fishnet magnet) because I kept putting another layer on top to try and get the pattern more developed. Probably ended up with between 3 and 5 layers on each nail.

You can see that in this pic Neptune Sea looks more blue than silver-
there's that much glitter/magnety magic in it.

The flash has bleached For Audrey a little, she's a bit more greeny IRL
As I said, I still need to get the hang of the magnetic polish, my best result (and only full nail showing the pattern) is on my right middle finger:
Which of course I forgot to clean up before I took pictures of it...sorry!

You can't really tell in this photo, but the pattern goes all the way
across, promise!
I've got quite a good one on my right thumb too, but it's only on half the nail...not sure how I managed that. I've seen some awesome swatches by other bloggers though, so I know that it IS possible to get a good strong pattern on each nail. I shall persevere and practise more and hopefully next time I try them it'll be a little better!


What are your opinions on magnetic polishes? Did you have any more success than me and have any hints? Let me know =)

~Nail Art Novice~


Title of post taken from the wonderful Little Shop of Horrors-Meek Shall Inherit

Wednesday, 6 February 2013

LGBT History Month Inspired Mani

In the UK, the month of February is recognised as LGBT History Month-celebrating the achievements and lives of LGBT people throughout history and today, which I think is a pretty important thing. Possibly even more important is that this is part of a larger scheme of charities and support groups working to help LGBT people, charities like Schools Out, working to eradicate homophobia and transphobia in schools and aiming to make them more inclusive.
In this month of saccharine sweet candy hearts, fluffy teddy bears and enormous bunches of roses, it's also worth remembering that around the world people are still fighting for the basic human right to love whoever they want to without fear of any repercussions, to be the person they've always felt like inside with the support of their governments, to marry the person they want to spend their lives with without people telling them it's wrong and immoral.
Though I myself am not LGBorT, the fight for equality and respect for all is one I fully stand behind because at the end of the day it doesn't matter if the person you love is the same or opposite gender to you, if you feel like you were born in the wrong body or the right one-we're all people. We should all be able to live and love as we choose to, and all be recognised for the awesome human beings that we are.

In celebration of LGBT history month and the fact that the UK is now one step closer to allowing gay marriage (hurrah!), I've done a mani based on their rainbow logo.
I started by painting my little, middle and index fingers with 2 coats of Barry M's Black Multi Glitter, followed by a top coat of Seche Vite as normal. Then I started my rainbow accents in a myriad of polishes:

Rimmel I Heart Lasting Finish in Double Decker Red, 
Rimmel I Heart Lasting Finish in Tangy Tangerine, 
London Girl
in Shade 148, OPI in Don't Mess With OPI
Barry M
in Cobalt Blue, Rimmel 60 seconds in Blue My Mind, 
Topcoat of  Rimmel I Heart Lasting Finish in Disco Ball
I'm sure there must have been an easier method than the one I used, which was ridiculous really-I taped off a small section of my nails and painted 2 coats of starting colour and waited for them to dry, then moved the tape up a little and started on the next colour. It took FOREVER and left me with a lumpy finish in stripes across my nail.

As you can see here...
After waiting an age for all the layers to dry naturally (as I didn't want to smudge them with top coat!) I added a layer of the glittery Disco Ball polish to add a little bit of extra sparkle and shine to my rainbows, followed by 2 coats of Seche Vite to take me to a (mostly) smooth finish. 
To be honest I really love how this turned out, even if it did take me hours. I've always loved rainbows and think they look really awesome on my nails-I'm just glad I only did accents as I was originally planning a full set!

The final effect!

Only including this one to show how lovely the black Barry M is too,
it's very sparkly and multicoloured.
I did each hand in opposite colours so that they're slightly different-here's a comparison shot of my thumbs so you get what I mean:
I like the fact they're not exactly the same =)
I'm not sure I could love this mani any more if I tried-it's amazing. By far the most complicated thing I've ever attempted but with the best results!

Hope you like it as much as I do!

~Nail Art Novice~

NB: I am entering this mani in The Crumpet's Amateur Nail Art contest this month. The theme is Love & Heartbreak, and I realise this doesn't really fit but it was inspired by a movement all about love so I'm going to enter anyway. Beautifully manicured fingers crossed!


Tuesday, 5 February 2013

Friendly Flowers

As I mentioned in my last post, that mani was created on a night where my friend did something rather more impressive that she's allowed me to share with you.
She's always loved ladybirds and when I happened to come across this beautiful ladybird/ladybug mani over at The Little Canvas I sent it to her because I knew she'd want to try it out. Alongside that she decide she wanted to some dotting tool flowers because she didn't want red polish on all of her nails. We practised together on a bit of old plastic packaging and were both surprised how easy the technique was to pick up and how effective it looked!
In total she used 8 polishes on her fingers, not including the base coat and top coat!


They were from L-R:
Number 17 Fast Finish in Nightshade, Rimmel I Heart Lasting Finish in  Block Your Green, Colour Me in Colour Me White, London Girl in un-named shade 148, Barry M in Cobalt BlueRimmel I Heart Lasting Finish in Double Decker Red, L.A Colors Art Deco in Black and a top coat of Rimmel I Heart Lasting Finish in Disco Ball. Phew! It was definitely worth it though because the results looked awesome! She kept The Little Canvas mani open for reference and then just freehanded her designs using the brushes in the polishes or dotting tools, and this was the result:


To say she's never really done anything like this before (neither have I for that matter) I was really impressed with how well this turned out and will definitely be trying both of these techniques soon. The design is so fun and bright, I know she's really pleased with it and so am I!

~Nail Art Novice + Friend~


Sunday, 3 February 2013

Unconnected Dots

I want to start this post with a little story, if you don't mind of course. A while ago I saw on a nail art/fashion blog I was browsing (which I'm sad to say has since been closed down) Lyndarella's Connect the Dots and I don't think I've ever wanted a polish as much as I wanted that one. I just loved the way it gave was was an otherwise plain coloured manicure a whole different dimension-it looks awesome and you can wear it with literally any colour/pattern and it still looks great. I set about scouring the internet for it, but (as I'm sure many of you will know) it's almost impossible to find, especially for UK based bloggers. So instead I went to Etsy and typed in 'black and white glitter polish' to see what I could come up with-there were hundreds.Of course I bought one, from an Australian Etsy shop called EmilydeMolly and then sat and waited impatiently for it to arrive, and finally, finally, it did.

As I said, this was all months ago, but it still remains one of my favourite glitter toppers because even the simplest of colours is transformed when you wear it.
On then, to the mani:

Every so often my best mate comes over and we watch silly films, drink hot chocolate, do face masks and paint our nails together, and it's delightfully silly and wonderful. Last night was such a night, and while she was busy doing some impressive looking but deceptively simple nail art on her fingers (post to come) I stuck with a simple manicure because I knew exactly what I wanted.
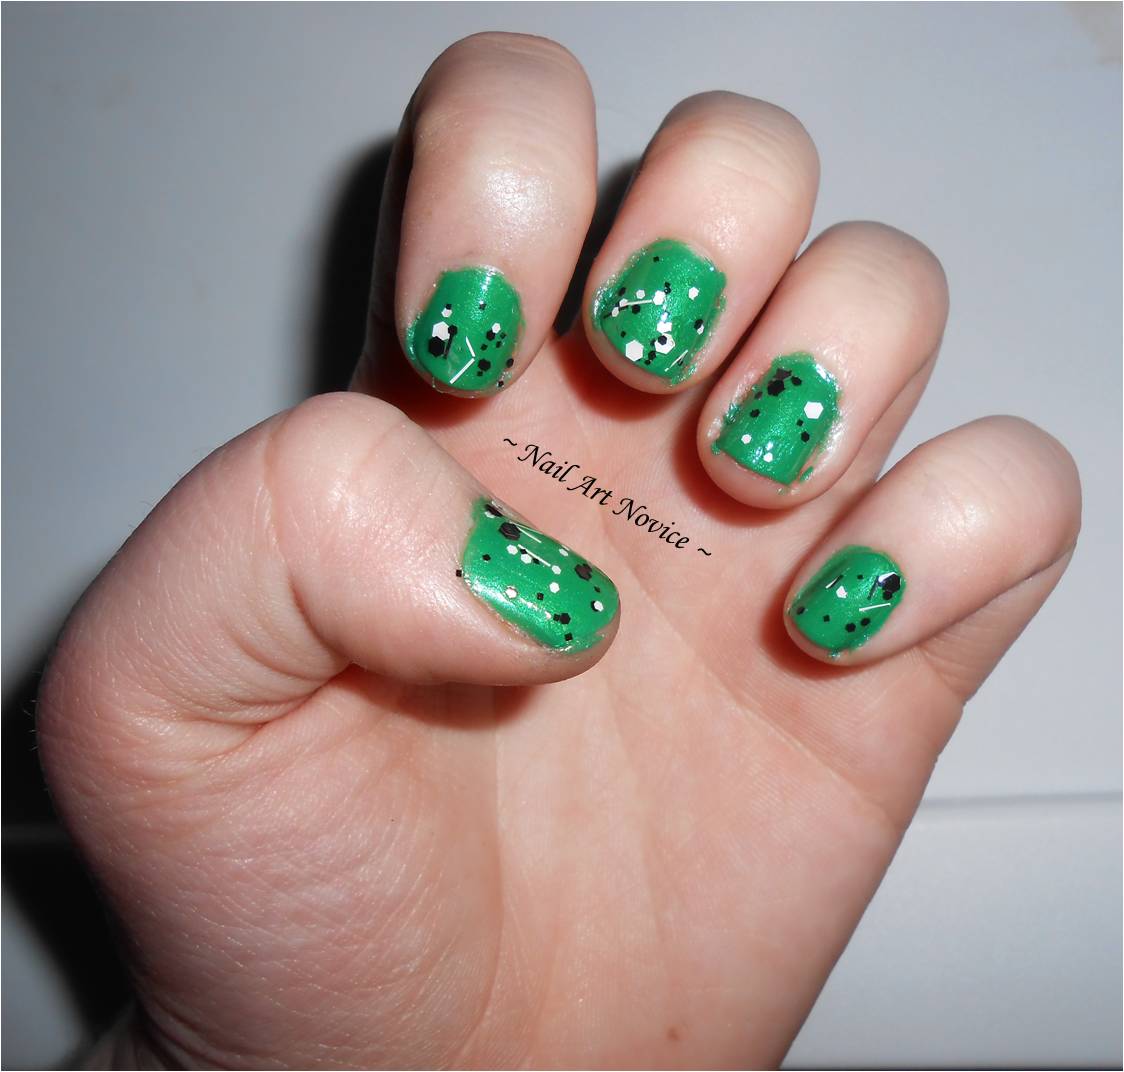
I used Sally Hansen Hard as Nails Xtreme Wear in Going Green, topped off with a coat of the gorgeous A Black and White Love Affair by EmilydeMolly. 
Going Green is a really lushiously bright grass green, with a very slight shimmer. A Black and White Love Affair is a B+W glitter topper with bar glitters, hexagonal and square glitters and is a twin for the Lyndarella polish I lusted after-thumbs up!


The pictures really don't do this colour justice, it's SO green. Think of your lawn on a really bright sunny day- it's that kind of colour, with a very subtle shimmer to it. And of course it looks even more amazing with the black and white blobs on top. This is another mani that makes me really happy, I just like to enjoy my slightly zany looking fingers, and it feels like spring is just around the corner wearing this colour.

Marvellous.

~Nail Art Novice~
Related Posts Plugin for WordPress, Blogger...